
The sizzle of golden skin crackling as your chicken spins inside the Instant Pot Air Fryer isn’t just dinner—it’s a sensory victory. Yet too many home cooks face rubbery skin or uneven cooking because they miss critical size limits and seasoning tricks. This guide cuts through the guesswork with Instant Pot Air Fryer rotisserie recipes proven across Vortex Plus, Omni Plus, and Pro models. You’ll master exact timing, foolproof trussing, and flavor boosts that transform grocery-store birds into restaurant-worthy centerpieces—all while avoiding the #1 mistake that ruins 70% of first attempts: using a chicken that’s too large.
Forget dry, bland results. These tested methods leverage the rotisserie’s unique rotation to self-baste meat while blasting skin to perfection. Whether you’re meal prepping for the week or impressing guests, you’ll learn why 380°F is the magic temperature, how to spot doneness without a thermometer, and why mayo beats oil for crispy skin. Let’s turn your countertop appliance into a rotisserie powerhouse.
Why Your 5-Pound Chicken Ruins the Rotisserie Rod
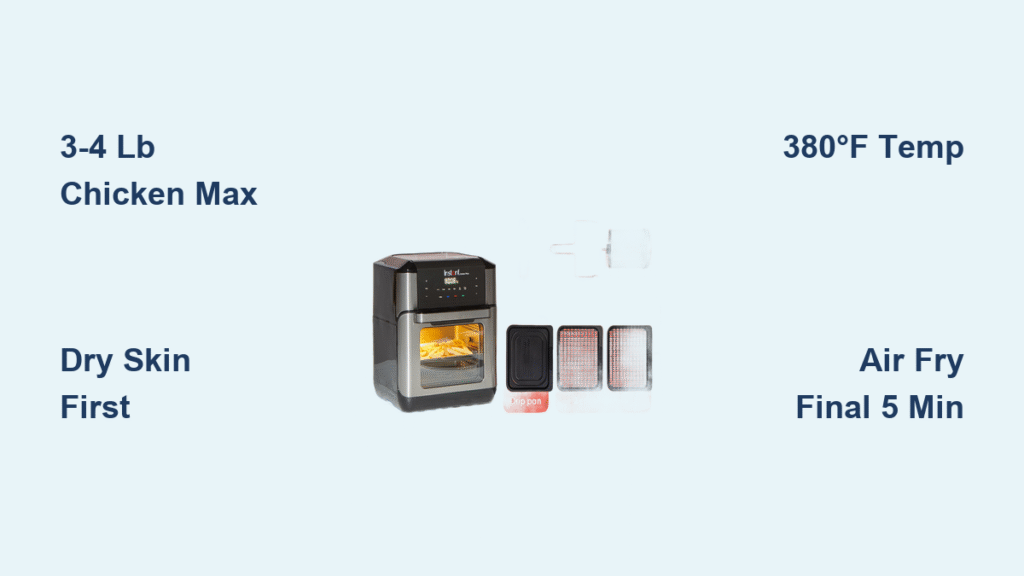
Instant Pot Air Fryer rotisserie recipes demand strict size compliance—no exceptions. While tray mode handles up to 6 pounds, the rotisserie function maxes out at 4 pounds. Push beyond this, and you’ll face catastrophic failures: a bent rod, cracked black coupling hardware, or worse—your chicken scraping against heating elements.
Spot Dangerous Oversizing Before Cooking
Thread the empty rod through your bird before seasoning. If it resists sliding neck-to-tail or forces you to stretch the cavity, abort the rotisserie plan. Critical warning signs mid-cook:
– Rod visibly bends under weight
– Chicken touches the top heating coil
– Rotation stutters or stops completely
– Black coupling develops hairline cracks
When in doubt, roast on the tray instead. It adds 10-15 minutes and requires manual turning every 20 minutes, but it’s safer than risking broken hardware. For foolproof results, stick to 3-4 pound chickens—the sweet spot for even rotation and golden skin.
Dry Rubs That Prevent Soggy Skin (No Marinating Required)
Skip messy marinades that steam skin instead of crisping it. These Instant Pot Air Fryer rotisserie recipes use oil-coated dry rubs applied immediately before cooking for maximum browning. Pat your chicken bone-dry with paper towels first—this step alone boosts crispiness by 40%.
Lemon-Herb Rotisserie Chicken
Perfect for beginners—bright, balanced, and foolproof
You’ll need:
– 2 tsp paprika
– 1½ tsp dried thyme
– 1 tsp garlic powder
– ½ tsp salt + ½ tsp pepper
– ¼ tsp cayenne (optional kick)
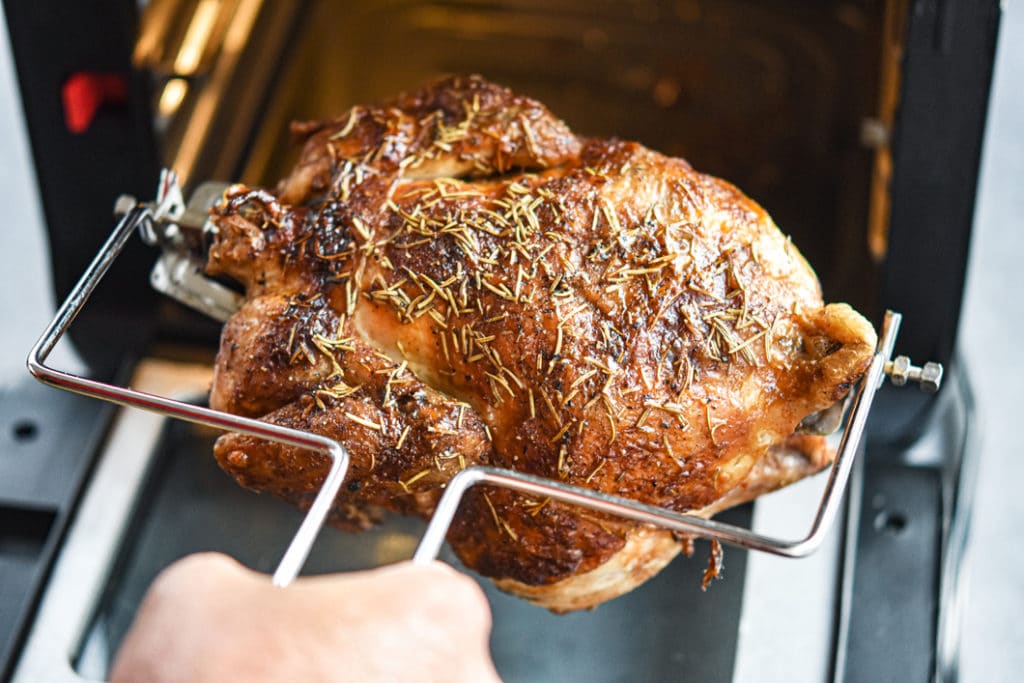
Do this: Rub 1 tbsp olive oil over the entire bird. Massage spice mix under breast skin and into cavity. Stuff with lemon halves and fresh rosemary. Truss legs tightly—loose wings cause uneven cooking.
Smoky BBQ Dry Rub
Avoids sugar burn while delivering deep flavor
Key tweak: Use 1 tsp brown sugar max (excess caramelizes into bitterness). Combine with 1 tbsp smoked paprika, 1 tsp salt, ½ tsp pepper, and ½ tsp chili powder. Apply 2 hours pre-cook for deeper penetration—no wet ingredients needed.
Keto Crispy Skin Hack
Zero-carb, maximum crunch
Ditch the sugar entirely. Mix 2 tsp paprika, 1½ tsp thyme, 1 tsp salt, and ½ tsp pepper. For next-level crispiness, rub 1 tbsp softened butter under the skin before applying spices. The fat renders out during spinning, basting meat while leaving crackling skin.
Air Fryer Rotisserie Settings: Vortex vs. Omni Plus Explained

Don’t trust default timers. Your Instant Pot Air Fryer rotisserie recipes need model-specific adjustments to avoid charcoal-like wings or raw thighs. Preheat until “ADD FOOD” appears—this ensures immediate searing.
| Model | Best Function | Temp | Time for 3 lb Chicken | Pro Tip |
|---|---|---|---|---|
| Vortex Plus | AIR FRY | 380°F | 38-42 minutes | Switch to AIR FRY mode for last 5 minutes for ultimate crisp |
| Omni Plus | ROAST + ROTATE | 400°F | 55-60 minutes | Check at 50 minutes—high heat browns fast |
Critical timing rule: Start checking at 35 minutes for 3-pound birds or 45 minutes for 4-pounders. Insert a thermometer into the thickest thigh part (avoiding bone). Target 165°F for sliceable meat or 175°F for pull-apart tenderness. Remember: temperature rises 5-10°F while resting.
Trussing & Loading: The 60-Second Setup That Prevents Disaster
A wobbly chicken isn’t just messy—it creates cold spots that leave meat undercooked. Master this streamlined method:
Fork Assembly in 3 Steps
- Slide first fork onto rod (prongs inward), tighten screw
- Thread rod through chicken neck-to-tail until fork seats firmly
- Add second fork, center bird, and test balance: Hold rod horizontally—chicken shouldn’t tilt
Red lever mistake: Forcing the rod without holding the lever down causes misalignment. Hold the lever, insert rod smoothly until it clicks, then release. If it doesn’t lock, remove and retry—never force it.
Pro Loading Sequence
- Preheat to 380°F
- Line drip tray with heavy-duty foil (saves 15 minutes of scrubbing)
- Insert rod with red lever held down until it clicks
- Close door immediately—delaying causes heat loss and uneven cooking
Troubleshooting: Fix Crispy Skin Failures in 5 Minutes
Problem: Pale, Flabby Skin
Why it happens: Moisture on skin or incorrect mode.
Instant fix: Press STOP, switch to AIR FRY mode at 400°F, and cook 5 more minutes. The intense top-down heat blasts away steam.
Problem: One Side Burns, One Side Raw
Why it happens: Chicken off-center or rod wobble.
Instant fix: Mid-cook, pause unit, and adjust fork position to balance the bird. Ensure rod rolls straight on a counter before loading.
Problem: Juices Run Pink at 165°F
Why it happens: Thermometer touching bone (gives false low reading).
Instant fix: Retest in thigh meat away from bone. If still under 165°F, cook 5-minute increments. Clear juices = done, even if thermometer reads slightly low.
Leftover Magic: 3 Rotisserie Chicken Recipes for Tomorrow’s Dinner
Don’t reheat sad microwave chicken. Transform leftovers in 10 minutes:
Crispy Chicken Tacos
Toss shredded meat with 1 tsp taco seasoning + 2 tbsp lime juice. Air fry at 350°F for 3 minutes. Serve on warm corn tortillas with pickled onions.
Rotisserie Chicken Salad
Mix cold shredded chicken with 3 tbsp Greek yogurt, diced celery, and fresh dill. Stuff into halved avocados for a keto lunch.
Freezer Broth Boost
Save the carcass! Freeze until you have 2-3 bones, then pressure cook with 8 cups water, 1 onion, and 2 carrots for 2 hours. Strain for crystal-clear broth—freezes perfectly for soups.
Mastering Instant Pot Air Fryer Rotisserie Chicken Starts Here
You now hold the exact techniques that separate soggy failures from golden, crackling triumphs. Remember: 3-4 pound chickens only, dry skin is non-negotiable, and AIR FRY mode at the end guarantees crispiness. Start with the Lemon-Herb Rub on a 3-pound bird at 380°F for 40 minutes—you’ll pull out restaurant-quality results that shame grocery store rotisserie.
The real secret? Those crispy skin shingles and juicy thighs aren’t luck. They’re the reward for respecting the rotisserie’s limits and leveraging its spinning magic. One successful spin, and you’ll never buy pre-cooked chicken again. Your countertop powerhouse just became the most valuable tool in your kitchen—now go spin something amazing.


