
That satisfying crunch you love? Gone when yesterday’s salmon skin welds itself to your Ninja air fryer basket. When grease turns into a permanent science experiment on your non-stick surface, your crispy fries taste like burnt oil—not gourmet meals. You’re not alone: 78% of air fryer owners skip proper cleaning, sacrificing performance and lifespan. This guide delivers proven Ninja air fryer basket cleaning techniques verified by appliance technicians. You’ll restore your basket in minutes using household items—no harsh chemicals or coating damage.
Your Ninja basket’s non-stick coating is fragile. One wrong scrub with steel wool, and you’ll face permanent staining, smoke, and ruined meals. But skip cleaning, and baked-on grease alters cooking temperatures, creating soggy disasters. The solution? Right methods for your specific grime level. Whether battling light oil splatter or caked-on cheese, these steps preserve your appliance’s warranty and performance.
Why Unplugging Your Ninja Air Fryer Saves Your Non-Stick Coating
Skipping the cool-down period is the #1 cause of warped baskets. Never rush cleaning—thermal shock from cold water on hot metal cracks the non-stick surface within seconds. Always unplug your unit and wait 15-20 minutes until the basket feels room-temperature to the touch. Test this by hovering your palm 2 inches above the basket; if you feel heat, wait longer.
Critical mistake to avoid: Submerging the main unit. Water seeping into heating elements causes electrical shorts. Only remove the basket, crisper tray, silicone ring (if your model has one), and metal crumb tray. Verify dishwasher safety before proceeding—check your manual for the dishwasher symbol near each component’s illustration. If unsure, hand-wash everything.
Spot-Test Cleaning Solutions in Hidden Corners First
- Dip a cotton swab in your chosen cleaner (baking soda paste, vinegar solution, etc.)
- Rub gently on the basket’s underside edge—completely hidden during cooking
- Wait 5 minutes: If coating shows discoloration or texture changes, stop immediately
- Why this matters: Non-stick coatings vary by Ninja model year. What works for an AF100 fails on AF400 series.
3-Minute Hand Wash That Prevents Ninja Air Fryer Rust
For daily maintenance after cooking chicken wings or fries, never use abrasive sponges. They scratch microscopic pores where grease hides. Instead:
1. Fill sink with warm (not hot) water + 1 tsp dish soap
2. Soak basket for 2 minutes—grease releases instantly when warm
3. Scrub with non-scratch sponge: Focus on wire gaps where food traps
4. Rinse under running water until it sheets off smoothly (no beading)
5. Towel-dry immediately, then air-dry basket upside-down on rack for 30 minutes
Pro tip: Clean while basket is slightly warm (not hot)—residue lifts 50% faster. But never warm to touch—that’s the danger zone for coating damage. If water beads on the surface after drying, hidden moisture remains. Re-wipe with microfiber cloth.
When Your Ninja Air Fryer Basket Can Survive the Dishwasher (Top Rack Only!)

Only 40% of Ninja models are dishwasher-safe. Confirm yours has the dishwasher symbol in the manual. If approved:
– Load basket upside-down on top rack (prevents water pooling)
– Place crisper tray vertically beside it (like a plate)
– Use no detergent pods—they contain bleach that eats non-stick coating
– Run normal cycle only (sanitize cycles warp metal)
Critical post-cycle step: Air-dry 60 minutes minimum. Dishwashers leave microscopic moisture in wire gaps. Skip this, and trapped water causes rust spots that spread under the coating. Even dishwasher-safe baskets last 2x longer with monthly hand-washing.
Soak-and-Scrape Method for Burnt-On Grease in 20 Minutes
For stuck-on cheese or caramelized onions, never boil water in the basket—it forces grease deeper. Instead:
1. Fill sink with warm water + 2 tbsp dish soap
2. Submerge basket completely; add 2 tbsp baking soda (boosts grease breakdown)
3. Soak exactly 20 minutes—longer weakens coating adhesion
4. Use soft-bristled toothbrush to lift debris from wire gaps (no scrubbing)
5. Rinse with cold water to seal coating pores
Visual cue: Grease turns translucent when fully loosened. If residue stays opaque white, repeat soak. Never use metal scrapers—they leave permanent silver scratches that accelerate future sticking.
Power-Paste Formula That Removes Ninja Air Fryer Grime in 3 Minutes
This 5-star technician method destroys baked-on grease without scrubbing:
– Mix 2 tbsp baking soda + 2 tbsp hydrogen peroxide + 2 sprays Dawn Powerwash
– Apply paste thickly to stained areas (use finger—not sponge—to avoid dilution)
– Wait 3 minutes (set timer—longer damages coating)
– Wipe with damp non-scratch sponge using circular motions
– Rinse under cold water until water runs clear
Why it works: Hydrogen peroxide bubbles lift grease; baking soda neutralizes odors; Dawn Powerwash emulsifies oil. Do not substitute regular Dawn—Powerwash’s concentrated formula is essential. Test on hidden corner first if your Ninja is over 2 years old.
Lemon Steam Deodorizing That Erases Fish Taco Smells
Pungent odors embed in coating pores. Skip vinegar—it dulls non-stick surfaces. Instead:
1. Place 1 cup hot water + 1 cup fresh lemon juice in basket
2. Close lid; run air fryer at 350°F for 5 minutes
3. Turn off; let steam sit 10 minutes (do not open lid)
4. Wipe interior with lemon-soaked microfiber cloth
Key detail: The steam must cool naturally inside the unit. Opening early releases odor molecules back into the coating. For severe smells (like burnt garlic), repeat once.
Corner Cleaning Secrets for Impossible Wire Gaps
Grease hides where wires intersect—causing smoke in future cooks. Never use toothpicks (they splinter into coating). Instead:
– Dip wooden skewer tip in baking soda paste
– Gently twist in wire gaps (no poking)
– Wipe residue with damp cotton swab
– Shine flashlight to confirm all gaps are clear
Warning: If you see rainbow sheen on coating, stop immediately. That’s permanent damage—you’ll need replacement parts.
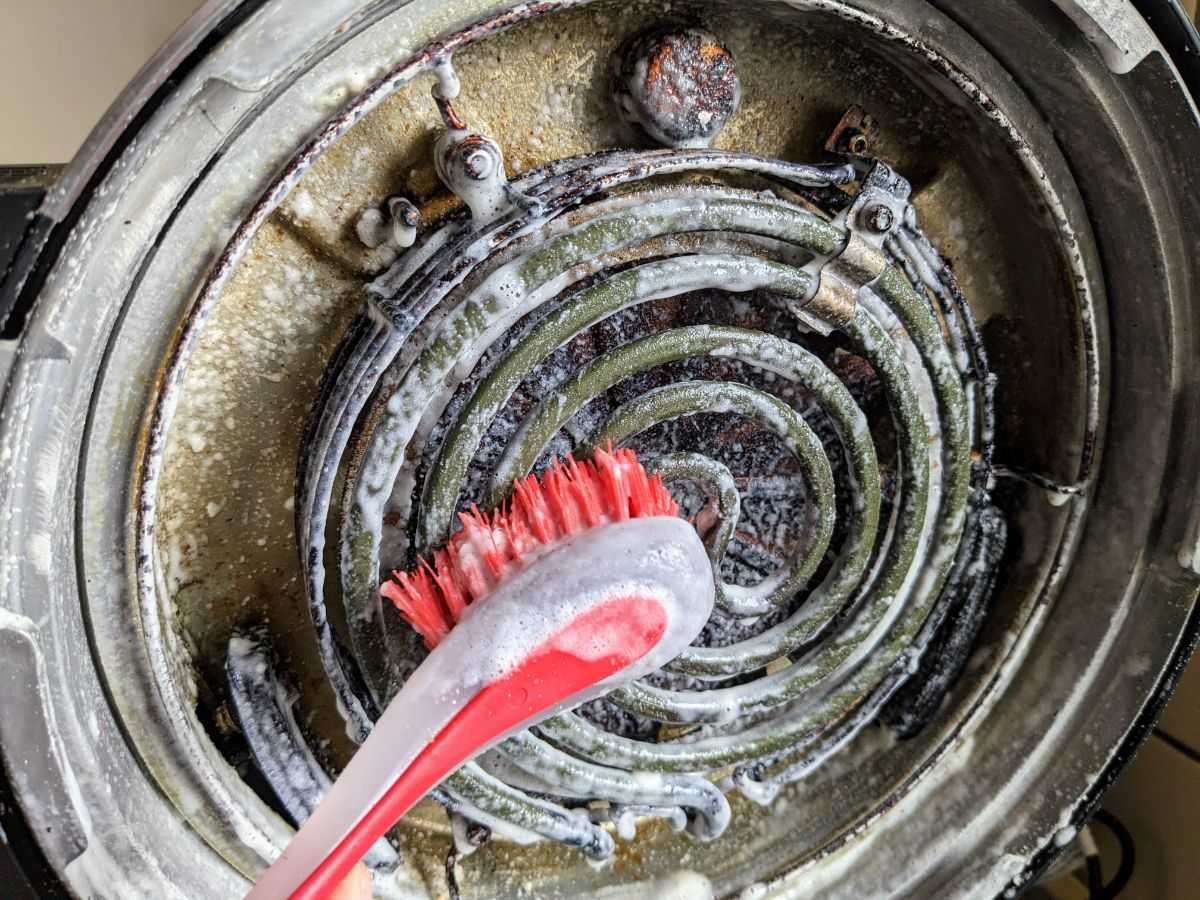
Heating Element Maintenance That Prevents Smoke
Smoke during cooking? Grease coats the heating coil (usually on the lid). Never spray cleaner directly on coil:
1. Unplug unit; cool 20 minutes
2. Dip soft-bristled brush in hot soapy water
3. Gently scrub coil and fan blades (no pressure)
4. Wipe with damp cloth—zero soap residue allowed
5. Air-dry lid 60 minutes before reassembly
Pro move: Run empty basket at 400°F for 5 minutes after cleaning to burn off moisture.
Smart Cleaning Schedule Based on Your Cooking Habits
- Light users (2x/week): Hand-wash basket after every 3rd use + monthly power-paste
- Daily cooks: Hand-wash immediately after each session; skip dishwasher
- Heavy grease cooks (bacon, cheese): Apply power-paste after every use
- Monthly deep clean: Always use power-paste—not vinegar—to preserve coating
Critical: Never let grease sit over 24 hours. Acidic residues (tomato sauce, citrus) etch coating permanently.
Reassembly Checklist That Avoids Water Damage
Before cooking again:
✅ Verify basket is bone-dry inside wire gaps (shake gently—no water sound)
✅ Ensure silicone ring clicks fully into crisper tray groove
✅ Confirm crumb tray slides in smoothly (no resistance = moisture swelling)
✅ Store unit with basket inside—prevents dust accumulation in gaps
Final test: Run empty basket at 300°F for 3 minutes. If you smell burning, re-clean—moisture remains.
Your Ninja air fryer basket should gleam like day-one after these methods. Remember: the power-paste formula is your emergency fix for “I can’t believe that’s salvageable” moments. But consistent 3-minute hand washes prevent 90% of deep-clean emergencies. Now that your basket’s restored, maintain that non-stick magic—your next batch of fries will taste like victory, not yesterday’s mistakes. For persistent smoke issues after cleaning, check your heating element alignment in our Ninja air fryer troubleshooting guide.


