

That first box sitting on your counter can feel intimidating—especially when you’re eager to cook crispy fries without the oil or perfect roasted chicken with minimal effort. Your Cosori Air Fryer Oven combines eight cooking functions in one sleek appliance, but unlocking its full potential starts with proper technique. This practical guide cuts through the confusion, showing you exactly how to operate your Cosori air fryer oven from day one to becoming a kitchen pro.
Unlike traditional ovens that take forever to heat up, your Cosori delivers restaurant-quality results with less oil and faster cooking times. But skipping the initial setup steps or misusing the rack positions can lead to unevenly cooked meals and frustrating results. By the end of this guide, you’ll know precisely how to load ingredients, select the right cooking modes, and maintain your appliance for years of reliable service.
Initial Setup and First Use

Unboxing Safety Check
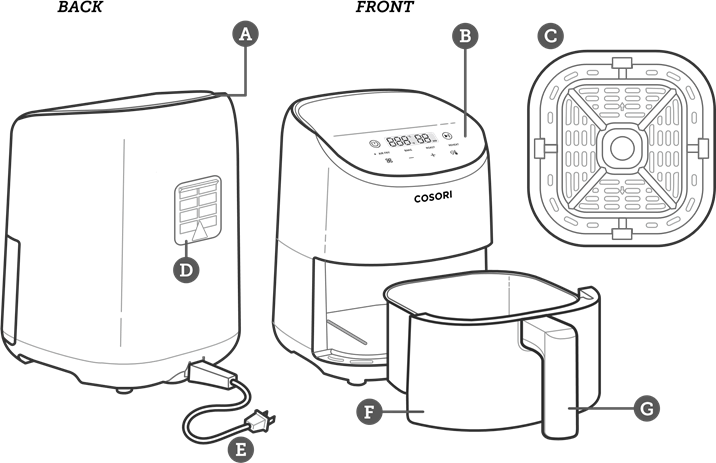
Remove your Cosori Air Fryer Oven from packaging and immediately inspect for shipping damage. Look for dents, cracks, or broken components on both the main unit and accessories. Verify all included items are present: main unit, crumb tray, wire rack, food tray, fry basket, rotisserie forks, rotisserie handle, and recipe book. Check the power cord for cuts or exposed wires before plugging in.
Essential First Cleaning
After removing all packaging materials and protective films, wash accessories in warm, soapy water using a soft sponge—never abrasive cleaners that could damage non-stick surfaces. Wipe interior walls, heating elements, and door with a damp cloth. Clean the exterior with a soft, damp cloth. Never immerse the main unit in water as this will damage electrical components. Thorough cleaning prevents any manufacturing residues from affecting your first meals.
Burn-Off Process
Place your Cosori Air Fryer Oven on a stable, heat-resistant surface with 5 inches clearance on all sides. Plug into a dedicated 120V outlet—never use extension cords. Set temperature to 400°F and run empty for 15-20 minutes. Slight smoke or odor is normal during this initial burn-off cycle as it eliminates manufacturing residues. Let the unit cool completely before cooking your first meal to avoid any residual tastes.
Control Panel Navigation
Display Interface Basics
The LED digital display clearly shows temperature, time, cooking mode, and preheat status. Touch buttons respond to light pressure and automatically dim after 30 seconds to save energy. The display brightness adjusts based on room lighting, making it easy to read in any kitchen condition. Familiarize yourself with these controls before your first cook to avoid mid-process confusion.
Cooking Modes Explained
Your Cosori offers eight specialized cooking functions:
- Air Fry Mode: 170°F-400°F range for crispy results with minimal oil
- Bake Mode: 170°F-450°F range ideal for cakes and casseroles
- Toast Mode: Six shade settings handling up to 6 slices
- Roast Mode: 170°F-450°F range with even heat distribution
- Broil Mode: High/low settings reaching 450°F for browning
- Dehydrate Mode: 95°F-170°F range for drying foods up to 48 hours
- Ferment Mode: Maintains 95°F perfect for dough proofing
- Reheat Mode: 170°F-350°F range prevents food from drying out
Each mode has specific temperature and time limits optimized for best results.
Preheating Procedures
When Preheating Matters
Preheating ensures even cooking from the start and is essential for baking, roasting, and air frying. The oven automatically suggests preheating for these functions. Unlike conventional ovens that take 10-15 minutes, your Cosori typically preheats in just 3-5 minutes depending on temperature. Skipping this step often leads to soggy exteriors and undercooked centers.
Manual Preheat Steps
Select your cooking mode and temperature, then press the preheat button (flame icon). The display shows “PH” during preheating. When complete, the unit beeps three times and displays “Add Food.” Work quickly after opening the door—temperature drops 25°F every 30 seconds. This rapid heat loss is why preheating matters for consistent results.
Food Positioning Guide
Rack Position Mastery
Your Cosori’s three rack positions dramatically affect cooking results:
- Position 1 (Bottom): Best for large roasts, whole chickens, or deep casseroles
- Position 2 (Middle): Default for air frying, baking, and general use
- Position 3 (Top): Ideal for broiling, toasting, or extra browning
Using the wrong position can mean the difference between perfectly golden and burnt food. For most everyday cooking, Position 2 delivers reliable results.
Accessory Selection Rules
Wire Rack: Essential for air circulation—always position feet down for stability during air frying and roasting.
Food Tray: Use as a solid surface for baking or place under wire rack to catch drips from messy foods.
Fry Basket: The mesh design creates maximum crispiness—shake or flip foods halfway through cooking.
Rotisserie Forks: Secure foods up to 5.5 pounds evenly on the spit rod for smooth rotation.
Food Arrangement Techniques
Arrange foods in single layers with space between pieces—overcrowding kills crispiness and increases cooking time by up to 50%. For multiple items, use both rack positions and rotate halfway through. Avoid cooking strong-smelling foods like garlic bread with delicate pastries to prevent flavor transfer.
Cooking Process Control
Starting Your Cook
Place food and accessories inside, then close the door firmly—the unit won’t start with door ajar. Select mode, temperature, and time before pressing Start/Pause. The fan activates first, followed by heating elements. Initial fan noise is normal and varies by cooking mode.
Monitoring Without Ruining Results
Use the interior light button to check progress without opening the door—the light turns off automatically after 30 seconds. Press Start/Pause before opening for crispiness checks. Never leave door open during operation—heating elements shut off automatically, wasting energy and extending cooking time.
Daily Cleaning Essentials
After-Each-Use Routine
Unplug and let cool completely (minimum 30 minutes). Remove accessories and wash with warm, soapy water. Wipe interior walls with a damp cloth—avoid heating elements which can be damaged by moisture. Empty and clean the crumb tray after every use to prevent smoke and odors. Clean door glass with glass cleaner or vinegar solution for visibility.
Accessory Care Guide
Wire racks and trays are dishwasher safe (top rack recommended). Clean the fry basket mesh thoroughly—use a soft brush for stuck particles. Hand-wash rotisserie parts, paying special attention to spit rod ends. Dry all accessories completely before storage to prevent rust and ensure longevity.
Troubleshooting Quick Fixes
Temperature Problems
Ensure 5-inch clearance on all sides for proper airflow. Check door seal for damage or debris affecting heat retention. Remember lower rack positions cook faster—adjust accordingly. Use an oven thermometer to verify accuracy if results seem off. Contact support if temperature varies more than 25°F from settings.
Smoke Issues
Excess oil or debris on heating elements causes smoking. Clean interior thoroughly after each use. Use lower temperatures for high-fat foods like bacon. Ensure proper kitchen ventilation. Persistent smoking indicates residue—run another burn-off cycle at 400°F for 10 minutes.
Safety Protocols
Operation Safety
Never use with damaged power cord or wet hands. Use oven mitts—exterior surfaces get hot during operation. Supervise children—surfaces stay hot 30+ minutes after use. Don’t store items on top. Ensure adequate ventilation space to prevent overheating.
Food Safety Rules
Verify internal temperatures: poultry 165°F, beef 145°F, pork 145°F. Don’t leave perishables at room temperature. Clean between raw and cooked foods. Follow USDA guidelines for safe handling—your Cosori cooks fast but doesn’t eliminate the need for proper food safety.
Recipe Adaptation Guide
Conventional Oven Conversions
Reduce temperature 25°F from conventional recipes. Cut cooking time by 20-30%. Check food 5-10 minutes before original times. Use visual cues and internal temperature over time estimates—your Cosori cooks faster due to concentrated heat circulation.
Oil Usage Optimization
Air frying needs 70-80% less oil than deep frying. Use maximum 1-2 tablespoons for most foods. Spray evenly with mister or brush. Choose high smoke point oils: avocado, peanut, or canola. Avoid aerosol sprays—use pump sprayers instead to prevent coating buildup on heating elements.
Your Cosori Air Fryer Oven becomes more intuitive with each use. Start with simple recipes, master the basics, then experiment with advanced techniques. Clean regularly and this versatile appliance will serve you well for years—delivering crispy, flavorful meals with minimal oil and maximum convenience. The key to perfect results? Proper setup, correct rack positioning, and never skipping that crucial preheat step.


