
That expensive tri-tip roast you bought deserves better than rubbery edges and a cold center. When your air fryer transforms this triangular cut into a restaurant-quality masterpiece with caramelized crust and rosy medium-rare tenderness in under 30 minutes, you’ll never fire up the grill again. Forget dry, overcooked results – mastering air fryer tri-tip means unlocking the Santa Maria style’s signature char without leaving your kitchen. You’ll learn exactly how to avoid the two most common disasters: gray, leathery exteriors and uneven doneness that ruins your $20 cut.
The air fryer’s superheated circulation works magic on tri-tip’s moderate marbling, but only if you respect its triangular shape and lean composition. One wrong move – like skipping the 20-minute countertop rest or crowding the basket – turns this premium cut tough. By the end of this guide, you’ll confidently handle any size roast from 1 to 4 pounds, nail perfect medium-rare every time, and rescue leftovers without drying them out. Let’s turn your air fryer into a steakhouse powerhouse.
Choose Right Tri-Tip Size for Your Air Fryer

Your air fryer basket size dictates tri-tip success more than seasoning. Most 5.8-6 quart models (like Instant Vortex or Ninja Foodi) max out at 3 pounds – any larger and the roast blocks critical airflow, creating pale, steamed edges instead of that coveted crust. The triangular shape means one end cooks faster, making size matching non-negotiable.
Match Roast to Basket Capacity
Critical weight limits by air fryer size:
– 4-quart units: Never exceed 1.5 pounds
– 5.8-6 quart units: Stick to 3 pounds max
– 8-quart units: Can handle 4 pounds
Measure your basket diagonally before buying. If the roast touches both sides when placed point-down, it’s too big. Crowding causes 40% more moisture retention – the enemy of browning. For smaller air fryers, request a “top butt” tri-tip from your butcher; it’s a narrower cut that fits better.
Fresh vs Frozen: The Thawing Imperative
Never cook frozen tri-tip directly. The air fryer’s intense heat sears the exterior while leaving a raw, bloody center. Thaw completely in the refrigerator: 24 hours per 2 pounds. Then, rest at room temperature 20-30 minutes before cooking – skipping this creates temperature shock that locks in juices unevenly. If you’re short on time, submerge the sealed package in cold water for 1 hour per pound.
Prep Tri-Tip for Air Frying Like a Pro
Surface moisture sabotages crust formation – the #1 reason for pale, boiled-looking tri-tip. This isn’t optional prep; it’s the foundation of flavor. Skip these steps and you’ll get steamed meat, not seared steak.
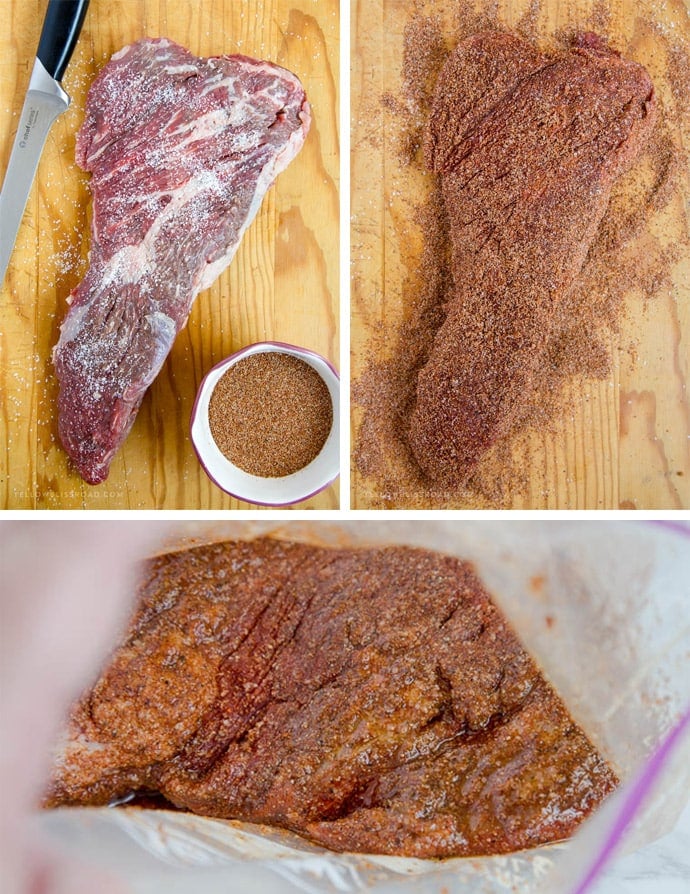
Dry Surface Completely (The 70% Rule)
Pat aggressively with paper towels until the surface feels sticky-dry. Pay special attention to the natural crevice where the two muscles meet – this moisture trap causes uneven cooking. For best results, place the roast on a wire rack over a tray in the fridge for 1 hour before cooking. This “dry brine” step pulls out residual moisture while concentrating flavor.
Oil Application Technique That Works
Use exactly 1-2 tablespoons of avocado oil (smoke point 520°F) or refined olive oil. Rub it in until the meat glistens but doesn’t drip. Too little oil prevents Maillard reaction; too much creates smoke and steam. Critical tip: If using a marinade, pat the roast bone-dry AFTER marinating – surface moisture negates all flavor benefits.
Seasoning Options That Work in Air Fryers
Tri-tip’s beefy flavor shines with simplicity, but the air fryer amplifies every note. Choose based on your timeline – both methods beat oversalted store rubs.
Santa Maria Dry Rub (30-Minute Miracle)
Mix for a 2-3 pound roast:
– 1 tablespoon kosher salt (not table salt – it’s denser)
– 1 teaspoon coarse black pepper
– 1 teaspoon garlic powder
– ½ teaspoon onion powder
– ½ teaspoon paprika
Rub evenly over all surfaces, then rest 30 minutes at room temperature. This waiting period lets salt penetrate beyond the surface, seasoning the interior while drawing out moisture for better browning.
Quick Marinade Method (1-Hour Rescue)
When time’s short, use this concentrated blend (for 2-3 lb roast):
– ¼ cup low-sodium soy sauce
– ¼ cup lemon juice
– ¼ cup olive oil
– 2 tablespoons Worcestershire
– 1 tablespoon brown sugar
– 1 teaspoon garlic powder
Marinate 1-8 hours, then pat completely dry before air frying. Acidic marinades tenderize but leave a wet surface – drying is non-negotiable for crust.
Air Fryer Temperature Settings That Guarantee Crust
400°F is the only temperature you need. Higher temps (like 450°F) burn the exterior before the center reaches medium-rare. The air fryer’s rapid heat circulation means tri-tip cooks 30% faster than oven roasting – precision is everything.
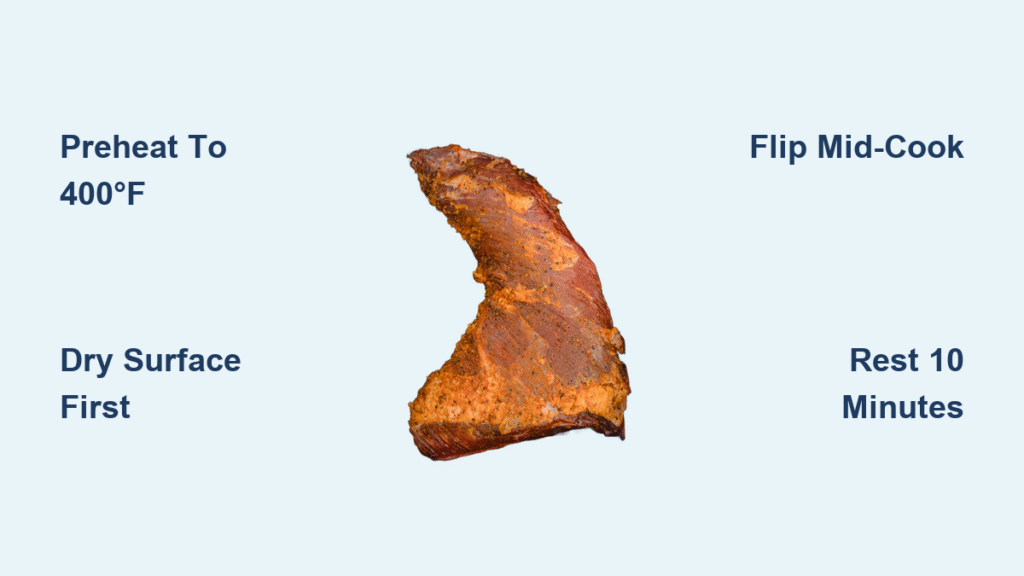
Preheat Protocol (The 3-Minute Secret)
Always preheat 3-5 minutes at 400°F. This isn’t marketing fluff – it ensures immediate sizzle when the roast hits the basket. Cold starts create a leathery texture by slowly steaming the meat. Skip preheating and you’ll waste $20 on tough tri-tip.
Temperature Monitoring Strategy (The 10°F Rule)
Pull your tri-tip 10°F below target temperature. It will rise during the mandatory 10-minute rest:
– Pull at 120°F for perfect medium-rare (130°F final)
– Pull at 130°F for medium (140°F final)
– Pull at 140°F for medium-well (150°F final)
Insert your thermometer horizontally into the thickest section, avoiding fat pockets that give false readings. Check every 2 minutes once you hit the estimated cook time – tri-tip goes from perfect to overdone in 90 seconds.
Step-by-Step Cooking Process (1.5 to 3 lb Roast)
Follow these exact steps for steakhouse results:
- Preheat air fryer 3-5 minutes at 400°F
- Place tri-tip fat-side up in basket (creates a self-basting effect)
- Cook 8 minutes per pound, then flip once
- Check temperature 2 minutes before estimated finish
- Pull at 120°F for medium-rare (see chart below)
- Rest 10 minutes tented with foil – skipping this loses 20% of juices
Timing Chart by Weight (At 400°F)
| Roast Weight | Total Cook Time | Pull Temp | Rest Time |
|---|---|---|---|
| 1 pound | 10-12 minutes | 120°F | 10 min |
| 2 pounds | 18-22 minutes | 120°F | 10 min |
| 3 pounds | 28-34 minutes | 120°F | 15 min |
Pro tip: Start checking temperature 2 minutes early. Basket placement affects cooking – if your roast sits near the heating element, it may cook 15% faster.
Troubleshooting Common Issues
Tough Meat? Fix These 3 Mistakes Now
- Overcooking: Pull 5°F earlier next time – tri-tip turns chewy past 140°F internal
- Skipping tempering: Always rest at room temperature 20-30 minutes before cooking
- Slicing with the grain: Identify grain direction on raw meat (it changes across the triangle)
Uneven Browning? Rotate and Reposition
Place the roast so the thickest end faces the heating element. At the halfway flip point, rotate 180° so all sides get equal exposure. If one side browns too fast, tent it with foil during the last 5 minutes.
Serving and Slicing Technique (Don’t Waste Juices)
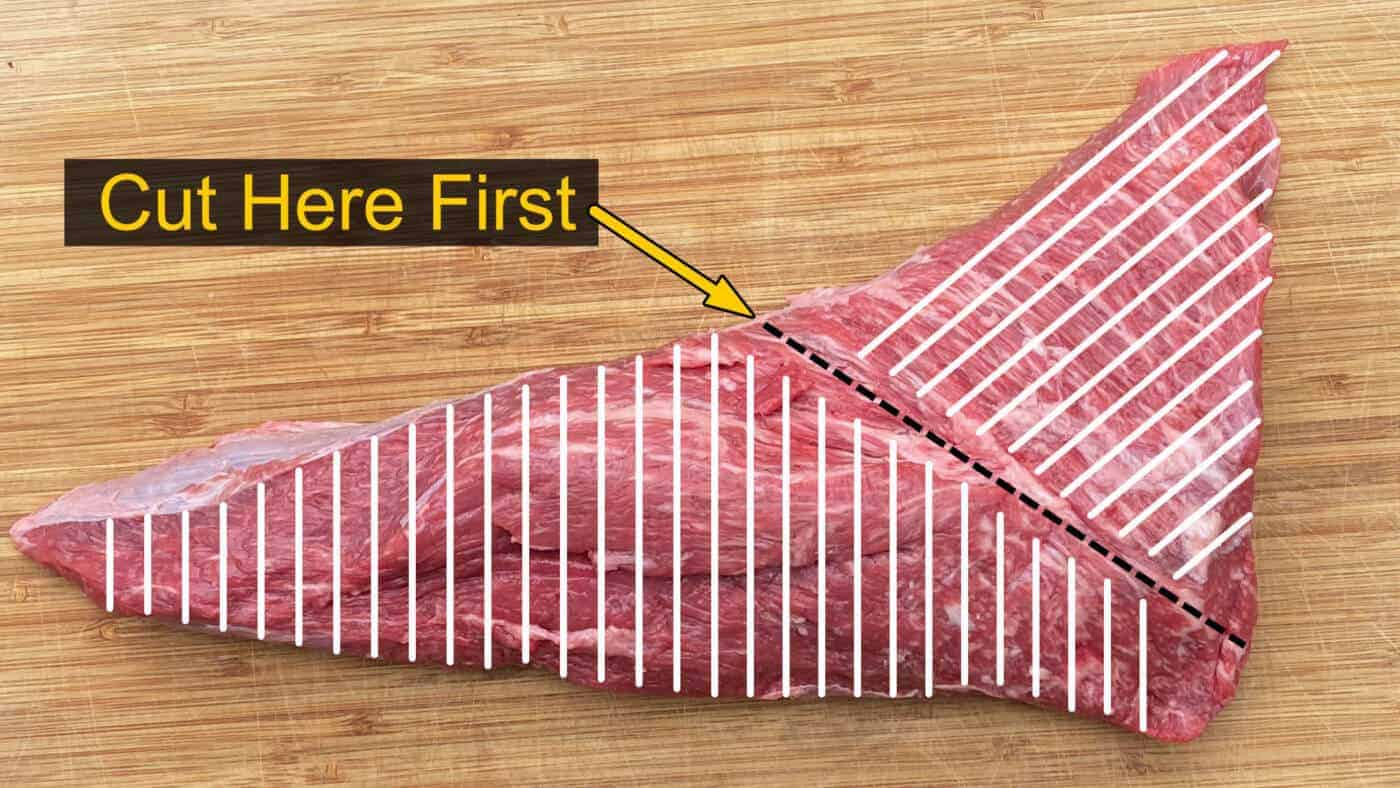
Tri-tip’s grain shifts direction across its triangle – slicing wrong ruins texture. Before cooking, note the grain lines: they run parallel to the longest side. After resting, slice perpendicular to these lines in ½-inch strips. Critical move: As you cut across the roast, rotate your knife angle to stay perpendicular to the changing grain. This separates muscle fibers for maximum tenderness.
Storage and Reheating Methods That Preserve Quality
Refrigerate leftovers in an airtight container up to 3 days – but never slice the entire roast. Only cut what you’ll serve immediately to prevent drying. For reheating:
– Air fryer method: 350°F for 4-5 minutes (single layer, no overlap)
– Never microwave: It turns tri-tip into shoe leather by unevenly heating proteins
Warning: Reheated tri-tip loses 15% moisture. Compensate by drizzling with reserved juices or herb butter during reheating.
Essential Equipment Checklist
Before starting, verify you have:
– Instant-read thermometer (ThermoPro or Lavatools recommended)
– High-smoke-point oil (avocado or refined olive oil)
– Sharp chef’s knife (dull blades tear meat fibers)
– Wire rack for pre-drying (prevents soggy bottom)
– Paper towels (thicker brands like Bounty work best)
Without a thermometer, you’re gambling with a $20 cut. The air fryer’s speed makes visual doneness checks useless – internal temperature is your only reliable guide.
Final Temperature Mastery
Your thermometer is non-negotiable. Insert horizontally into the thickest section, avoiding fat pockets that read falsely high. For a 2-pound roast, start checking at 16 minutes – tri-tip’s leanness means it cooks fast. Pull at 120°F for medium-rare, tent with foil, and let carryover cooking do the rest. This single technique transforms your air fryer from a gadget into a precision cooking tool that delivers perfect tri-tip every time. Master this, and you’ll never settle for gray, overcooked results again.


