

Tired of water splatters, cracked shells, and rubbery yolks ruining your hard-boiled egg routine? Your air fryer delivers consistently perfect hard-boiled eggs without boiling a single drop of water. This hands-off method eliminates pot scrubbing, constant timer watching, and the frustration of peeling stubborn shells. In just 14 minutes flat, you’ll get tender whites and vibrant yellow yolks every time—no kitchen vigilance required. I’ll show you the exact temperatures, timing adjustments, and pro techniques that work across all major air fryer models, turning your countertop appliance into the ultimate egg-cooking tool.
Forget battling boiling water bubbles or guessing cook times. Air fryers create ideal hard-boiled eggs through precise, circulating heat that penetrates shells evenly from all angles. This gentle cooking method prevents the green sulfur rings that plague overcooked stovetop eggs while building the perfect air pocket for effortless peeling. Whether you’re meal prepping for the week or need a quick protein snack, this foolproof technique delivers restaurant-quality results with zero cleanup. Let’s transform how you cook hard-boiled eggs forever.
Why Your Air Fryer Makes Better Hard-Boiled Eggs Than Stovetop
Stovetop boiling demands constant attention to prevent cracking and overcooking, but air fryers deliver consistent results through controlled dry heat. The circulating 250°F air cooks eggs gently without thermal shock, eliminating the shell cracks caused by dropping cold eggs into boiling water. You’ll never deal with murky, protein-filled water again since there’s no water involved—just pure, hands-off cooking. Most importantly, air-fried eggs develop a larger air pocket between shell and membrane, making peeling nearly effortless compared to water-boiled counterparts.
Critical advantages you can’t ignore:
– Zero monitoring – set time and walk away while it cooks
– Uniform texture – no rubbery edges or chalky yolks
– Batch flexibility – cook 1 or 12 eggs with identical results
– No water mess – eliminate boiling spills and pot scrubbing
Air Fryer Requirements for Flawless Hard-Boiled Eggs
Don’t assume your model can’t handle eggs—nearly all air fryers work if they meet these specific requirements. Your unit must maintain temperatures between 250°F and 300°F with consistent heat distribution. Basket-style units like the Instant Vortex (1700W) and Cosori (5.5L) excel, but rack-based models like the Philips Avance XL (2100W) work equally well if you use a mesh tray for 360° airflow. Compact units like the Farberware (1300W) require just 1-2 minutes longer cooking time.
Pro adjustment for high-minimum models:
If your air fryer won’t go below 300°F (like some Ninja Foodi units), reduce cook time by 1-2 minutes and watch for harmless brown pressure spots on shells—these indicate proper air circulation. Always arrange eggs in a single layer with ½-inch gaps; stacking causes uneven cooking that ruins texture.
4-Step Air Fryer Hard-Boiled Egg Method
Pre-Heat to Exact 250°F Temperature
Set your air fryer to 250°F (120–135°C) and pre-heat for 3–5 minutes. This critical step stabilizes the cooking environment, preventing undercooked centers. Skip pre-heating, and you’ll add 2-3 unpredictable minutes to cook time as the unit ramps up. Models with digital displays show readiness faster than dial units—wait until the indicator light turns off before loading eggs.
Load Straight-from-Fridge Eggs Correctly
Place cold large eggs directly from your refrigerator into the basket. Arrange them in a single layer with ½-inch gaps between each egg—overcrowding blocks airflow and creates soft spots. Standard 5.3-quart baskets hold up to 12 eggs, but start with 6 for your first batch to ensure proper circulation. Never use room-temperature eggs; the thermal shock from cold-to-hot air creates perfect texture.
Set Precise Cook Time for Your Yolk Preference
Follow these exact timings based on your desired result:
– Soft-boiled (runny center): 9–12 minutes
– Jammy yolk (custard-like): 11–14 minutes
– Classic hard-boiled: 13–17 minutes
Begin with 14 minutes for your test batch. Wattage matters: 1300W units need the full 17 minutes while 2100W models may only require 13. Set a timer—you’ll hear a subtle “puff” sound when eggs are fully cooked.
Ice Bath Shock Within 30 Seconds
Immediately transfer eggs to an ice-water bath using tongs. Submerge completely for 4–10 minutes until shells feel cold. This stops carry-over cooking that causes green sulfur rings and creates the air pocket essential for peeling. Skip this step, and yolks overcook within minutes while shells stick tenaciously to whites.
Hard-Boiled Egg Timing Chart for Every Air Fryer Model

| Your Air Fryer Type | Wattage | Soft-Boiled | Jammy Yolk | Hard-Boiled |
|---|---|---|---|---|
| Standard basket (Instant Vortex, Cosori) | 1700W | 10 min | 12–13 min | 14–16 min |
| Compact units (Farberware, Dash) | 1300W | 11 min | 13 min | 16 min |
| Large capacity (Philips Avance XL) | 2100W | 9 min | 11 min | 14 min |
| 300°F minimum (Ninja Foodi) | Any | 8–9 min | 10 min | 13 min |
Note: Brown, slightly bumpy spots on shells are harmless pressure marks from hot air circulation—never a sign of overcooking.
Pro Secrets for Perfectly Centered Yolks and Easy Peeling
Choose Eggs 5–7 Days Old for Effortless Peeling
Grocery-store eggs work best—they’re naturally 5–7 days old, allowing the air pocket to expand for clean separation. Fresh farm eggs bind tightly to shells; avoid them for this method. Always use large eggs; adjust time by -1 minute for mediums or +2 minutes for jumbos.
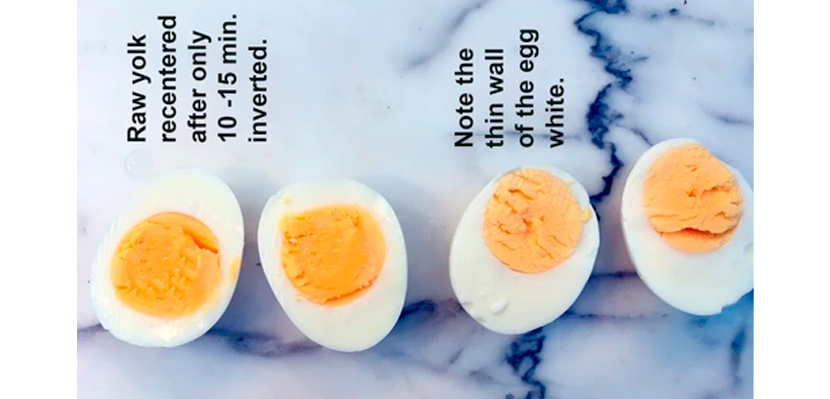
Center Your Yolks Overnight Like a Pro
Rest the egg carton on its side in the refrigerator 12–24 hours before cooking. This gently shifts yolks to the center, creating picture-perfect slices for deviled eggs or salads. Never skip this if presentation matters.
Avoid These 3 Costly Mistakes
- Overcrowding the basket → Causes uneven cooking (always leave gaps)
- Skipping the ice bath → Guarantees stuck shells and overcooked yolks
- Using room-temperature eggs → Creates cracked shells and watery whites
Single-Egg Test: Find Your Air Fryer’s Sweet Spot
Every unit behaves differently—run this foolproof test before cooking a full batch:
1. Pre-heat air fryer 3 minutes at 250°F
2. Cook one cold large egg for 14 minutes
3. Transfer immediately to ice bath for 5 minutes
4. Peel and evaluate yolk texture
5. Adjust next batch time: +1 minute if runny, -1 minute if green ring appears
Record your perfect time (e.g., “15:20 for my Cosori”) and use it consistently. Once dialed in, scale to 12 eggs without changing timing—the air fryer maintains heat distribution.
Safe Storage: Keep Hard-Boiled Eggs Fresh for 7 Days
Unpeeled eggs last 7 days in any refrigerator container—no special wrapping needed. For peeled eggs, use one of these methods:
– Submerge in cold water (change daily)
– Store in airtight container with damp paper towel
Never freeze whole hard-boiled eggs—whites turn rubbery. Freeze yolks only in freezer bags for up to 3 months. Always refrigerate within 2 hours of cooking to prevent bacterial growth per USDA guidelines.
Flavor Boosters: 5 Seasoning Ideas for Air-Fried Eggs
Transform basic eggs into gourmet snacks with these instant upgrades:
– Everything Bagel Power: Roll peeled eggs in everything seasoning
– Spicy Tajín Kick: Dust with chili-lime Tajín for tangy heat
– Herb Garden Fresh: Press cracked eggs into chopped dill/chives
– Smoked Paprika Elegance: Sprinkle with smoked paprika and flaky salt
– Sesame Ginger Zing: Toss with toasted sesame seeds and ginger powder
Air-fried eggs shine in egg salad sandwiches, ramen bowls, or as protein-packed salad toppers—no watery texture from boiled eggs.
Fix Common Air Fryer Egg Problems in Seconds
| Problem | Instant Solution |
|---|---|
| Runny center when hard desired | Add 1–2 minutes to next batch |
| Green ring around yolk | Reduce time by 1 minute OR drop temp 10°F |
| Shell sticks to white | Use older eggs + mandatory ice bath |
| Egg bursts during cooking | Lower temp to 250°F; always pre-heat |
Green rings indicate overcooking—never a safety issue but affects texture. Burst eggs happen when units exceed 270°F without pre-heating; the rapid temperature spike cracks shells.
Mastering how to hard boil eggs in air fryer eliminates stovetop hassles forever. With your personalized timing locked in, you’ll get perfect peelable eggs in 14 minutes—ideal for meal prep or quick snacks. Remember the golden rules: always use cold eggs, never skip the ice bath, and run that single-egg test first. Your air fryer isn’t just for fries anymore; it’s the secret weapon for flawless hard-boiled eggs all week long. Ready to never boil water for eggs again? Grab your air fryer and make your first batch tonight.


