
If you’ve noticed smoke during cooking or persistent odors from your Philips air fryer, you’ve probably wondered: “Does Philips air fryer have a filter that needs cleaning?” You’re not alone—thousands of users mistakenly search for filters in their units, thinking this is the solution to performance issues. The reality is more nuanced than most air fryer owners realize, and understanding your specific Philips model’s design can prevent unnecessary disassembly or missed maintenance steps that lead to premature wear.
Unlike traditional deep fryers with oil filtration systems, Philips air fryers use Rapid Air Technology that circulates hot air around food instead of submerging it in oil. This fundamental difference means most models don’t contain conventional filters at all. However, newer premium models have introduced specialized odor-reducing components that function similarly to filters. Let’s cut through the confusion and reveal exactly what your Philips air fryer contains and how to maintain it properly—whether your unit has actual filters or relies on smart engineering to handle grease and odors.
Why Your Philips Air Fryer Might Not Have a Traditional Filter
Classic Models’ Grease Management System
Philips HD9200 series air fryers (models HD9216, HD9220, HD9230) completely eliminate the need for filters through their innovative basket design. As food cooks, excess fat drips through the perforated basket into the bottom pan where it collects away from the heating element. The rapid air circulation naturally carries minimal grease particles away from the cooking chamber, making traditional filtration unnecessary. This design explains why opening these units reveals no filter compartments—what users often mistake for filters are actually structural components of the heating system.
How Ventilation Replaces Filtration in Standard Units
When you see steam escaping from your Philips air fryer during cooking, that’s the intentional ventilation system at work. These models feature precisely engineered airflow channels that direct steam and minimal cooking odors out through the top vents without trapping particles. The smooth interior surfaces prevent grease buildup in hard-to-reach areas, meaning regular cleaning of accessible components keeps performance optimal. If your unit is making unusual noises or producing excessive smoke, the culprit is almost always neglected cleaning—not a “dirty filter” as many assume.
Identifying Actual Filter Components in Premium Models

XXL Series Odor-Reducing Filters Location
Certain Philips XXL models (HD9650, HD9860 series) incorporate activated charcoal filters specifically designed to absorb cooking odors. These small rectangular filters sit behind the heating element, accessible only by removing the rear panel. Unlike traditional filters that capture grease, these components target volatile organic compounds that cause lingering smells. You’ll know your model has this feature if the product description mentions “odor control technology” or if you see replacement filters available for your specific model number.
How Premium Model Filters Actually Function
These charcoal filters work through adsorption—molecules of cooking odors stick to the filter’s porous surface rather than passing into your kitchen air. They don’t affect cooking performance or grease management, which still relies on the standard basket-and-pan system. The filters become saturated over time, losing effectiveness after 3-6 months of regular use. When you start noticing stronger cooking smells lingering in your kitchen despite proper ventilation, it’s time to check or replace this component.
Step-by-Step Model Verification Process
Finding Your Exact Model Number
Your air fryer’s model number holds the definitive answer about filter presence. Check these three locations:
– Bottom of the unit: Most models have a sticker with model/serial numbers
– Inside the basket handle: Some newer models print it inside the pull tab
– Original packaging: The box clearly displays the full model designation
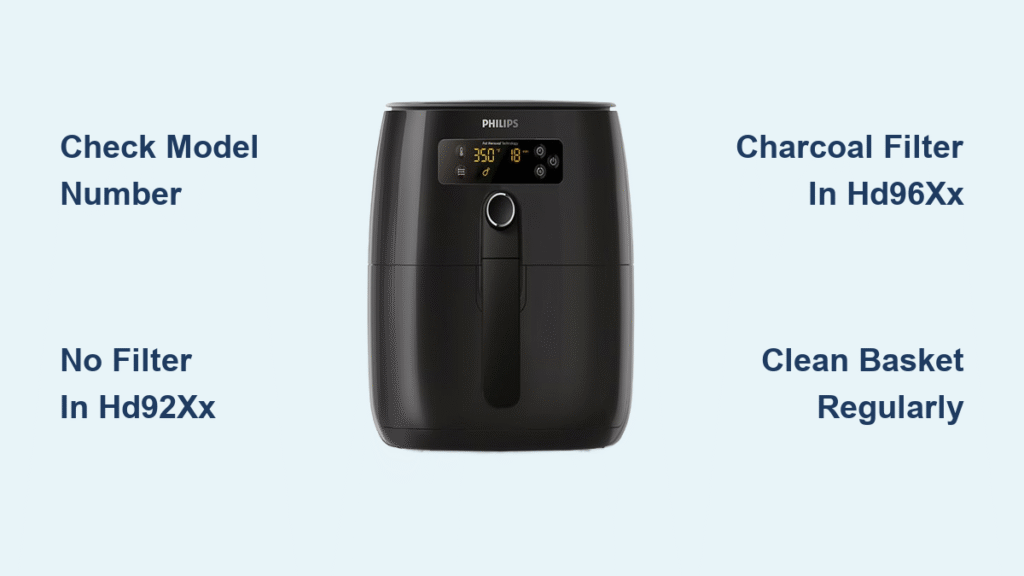
Models beginning with HD92xx almost never contain filters, while HD96xx and HD98xx series typically include odor-reducing filters. The presence of “Twin” or “Premium” in your model name also strongly indicates filter inclusion. Don’t rely on physical appearance alone—two units that look identical might have different internal components based on manufacturing date.
Manual Search Technique for Filter Information
Rather than reading your entire manual, go straight to these sections:
1. Cleaning instructions: Filter maintenance appears in prominent cleaning steps
2. Troubleshooting guide: Odor-related issues mention filters if applicable
3. Accessories list: Replacement filters appear in parts diagrams
If your manual contains no mention of “filter replacement,” “charcoal filter,” or “odor filter,” your model operates without this component. Many users miss this critical detail because they search for “filter” in physical manuals rather than checking the index for related terms like “odor control.”
Proper Maintenance for Filter-Free Models
Critical Cleaning Zones Often Missed
Even without filters, specific areas require regular attention to prevent performance issues:
– Basket mesh holes: Use a soft brush to remove stuck food particles after each use
– Heating element guard: Wipe weekly with a damp microfiber cloth (never submerge)
– Ventilation slots: Clear debris monthly with a dry toothbrush
– Sealing ring: Check for grease buildup that affects cooking efficiency
Neglecting these areas creates the exact symptoms users attribute to “dirty filters”—smoke during cooking, longer cooking times, and persistent odors. A thorough 10-minute cleaning session weekly prevents most performance issues in filter-free models.
Natural Odor Elimination Methods
When your filter-free Philips air fryer develops cooking smells:
– Citrus steam treatment: Fill the pan with water and lemon slices, run at 400°F for 5 minutes
– Baking soda paste: Apply to stubborn grease spots, wait 15 minutes, then rinse thoroughly
– Vinegar solution: Wipe interior with 50/50 white vinegar and water mix to neutralize odors
These methods address the root cause—residual grease and food particles—not a non-existent filter. Consistent use after heavy cooking sessions keeps your unit smelling fresh without special components.
Filter Replacement Procedure for Compatible Models
Safe Removal of XXL Series Filters
Follow these exact steps for HD9650/9860 series filter replacement:
1. Cool completely: Wait 45 minutes after last use to avoid burns
2. Unplug unit: Safety first—never work on plugged-in appliances
3. Remove rear panel: Unscrew the 4 Phillips-head screws carefully
4. Slide out filter: Pull straight back without twisting the fragile housing
5. Insert replacement: Align new filter perfectly before pushing firmly into place
Forcing the filter during installation damages the housing, creating gaps that reduce effectiveness. Genuine Philips filters click audibly when properly seated—listen for this confirmation before reassembling.
Genuine vs. Generic Filter Performance

Third-party filters often fail due to:
– Incorrect dimensions: Even 1mm gaps allow unfiltered air to bypass
– Inferior charcoal: Less adsorption capacity means shorter lifespan
– Poor housing design: Doesn’t seal properly with Philips’ airflow system
Philips’ official filters undergo rigorous testing to maintain airflow balance while capturing odors. Using non-genuine parts can actually worsen performance by disrupting the carefully engineered air circulation that makes these appliances efficient.
Preventing Common Filter-Related Misconceptions
Components Mistaken for Filters
Users frequently confuse these standard parts with filters:
– Basket bottom mesh: Essential cooking surface, not a removable filter
– Heating element cover: Protects the coil but doesn’t filter air
– Top vent grill: Directs airflow but requires no maintenance
Attempting to remove or clean these components as if they were filters often causes damage. The basket mesh, for example, has precisely sized holes that affect cooking performance—if you can remove it, you’re damaging your appliance.
When to Seek Professional Service
Contact Philips support immediately if you notice:
– Grease leaking from vents: Indicates serious internal damage
– Electrical burning smells: Signals potential component failure
– Visible damage to heating element: Safety hazard requiring expert repair
Never attempt to disassemble your air fryer beyond user-serviceable parts. Most models have tamper-proof seals, and unauthorized repairs void your warranty while creating electrical hazards. The $50 service call fee is minor compared to replacement costs for a damaged unit.
Maximizing Your Air Fryer’s Lifespan Without Filters
Daily Maintenance Checklist
Spend just 90 seconds after each use:
– Remove and empty the bottom pan while still warm (cooled slightly)
– Rinse basket under warm water to prevent baked-on residue
– Wipe accessible interior surfaces with a damp cloth
– Store with basket slightly ajar to prevent moisture buildup
This simple routine prevents 95% of performance issues users mistakenly attribute to “filter problems.” The key is consistency—waiting until grease hardens makes cleaning exponentially harder and risks damaging non-stick coatings.
Performance Monitoring Indicators
Track these metrics monthly to catch issues early:
– Cooking time changes: Timings increasing by 2+ minutes indicates buildup
– Odor persistence: Smells lingering >30 minutes after cooking
– Exterior temperature: Unit feeling hotter than usual during operation
These subtle changes signal maintenance needs long before major problems develop. Reset your performance baseline after deep cleaning to track effectiveness of your maintenance routine.
Your Philips air fryer’s filtration needs depend entirely on your specific model number—there’s no universal answer to “does Philips air fryer have a filter.” Classic HD9200 series units manage grease through smart engineering without filters, while premium XXL models incorporate specialized odor-reducing filters requiring periodic replacement. The most common performance issues stem from neglected cleaning of accessible components, not mysterious filters. By identifying your exact model and following the appropriate maintenance routine, you’ll maximize cooking performance and extend your appliance’s lifespan significantly. When in doubt, consult your manual’s cleaning section or visit Philips’ official support site with your model number for definitive filter information—never disassemble your unit searching for components that don’t exist in your model.


