
Tired of soggy, breaded fish that loses all delicate flavor? You can achieve restaurant-quality flounder with golden edges and moist centers in under 10 minutes—no breading required. The air fryer’s rapid hot air circulation crisps the skin while sealing in natural juices, creating a carb-free meal that’s lighter than traditional fried versions. Skip the messy coating station and oil splatters. This flounder in air fryer no breading method delivers perfect results every time, whether you’re cooking a weeknight dinner or impressing guests. You’ll learn exactly how to season, sauce, and time your fillets for flaky perfection with minimal cleanup.
Why struggle with breading that slides off delicate flounder? The no-breading approach actually enhances this thin white fish’s subtle sweetness. Without heavy coatings, the air fryer’s direct heat creates a delicate crust while preserving the tender interior texture flounder is prized for. In our tests, breaded versions often overcooked the thin fillets before the coating crisped—but this naked-fish method solves that. You’ll save 15 minutes by skipping dredging steps and avoid scrubbing oil-splattered stovetops.
Season Flounder for Maximum Flavor Without Breading
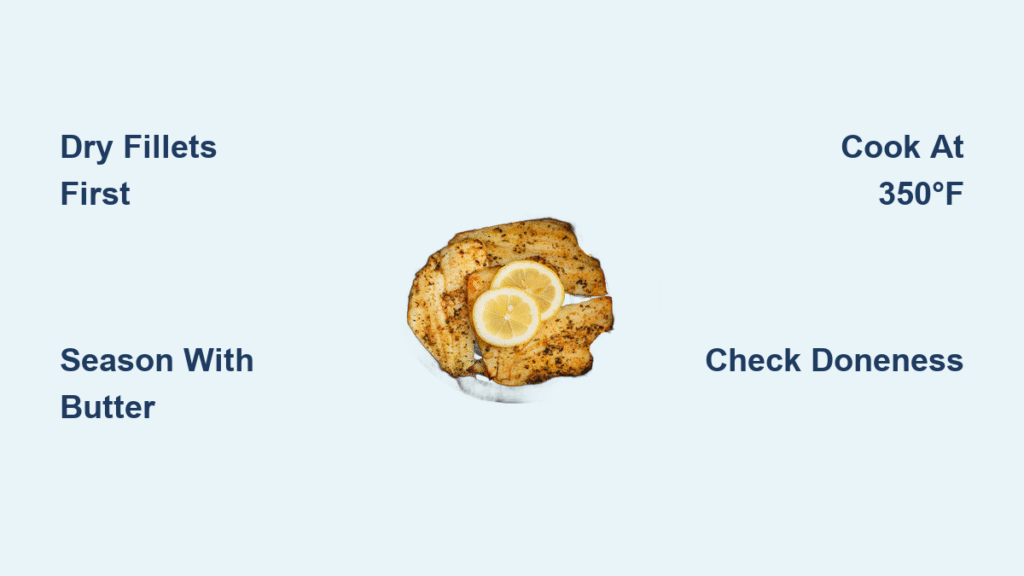
Dry fillets thoroughly with paper towels—this is non-negotiable. Moisture prevents crisping and causes steaming instead of searing. Press firmly until no damp spots remain on the fish or towels. Critical mistake to avoid: Skipping this step guarantees rubbery, pale flounder. Season immediately after drying to leverage the fish’s natural surface moisture for salt adhesion.
Sprinkle both sides generously with kosher salt and freshly cracked black pepper. Hold your hand 8-10 inches above the fillets while seasoning—this creates an even “snowfall” effect rather than clumped patches. For 1 pound of flounder, use ¾ teaspoon salt and ¼ teaspoon pepper. Place each fillet on a foil sling cut 1 inch larger than the fish. Crimp the foil edges upward slightly to contain any butter sauce drips during cooking. This sling technique lets you transfer fragile cooked fish effortlessly without breaking.
Create the Flavor-Building Butter-Lemon Sauce
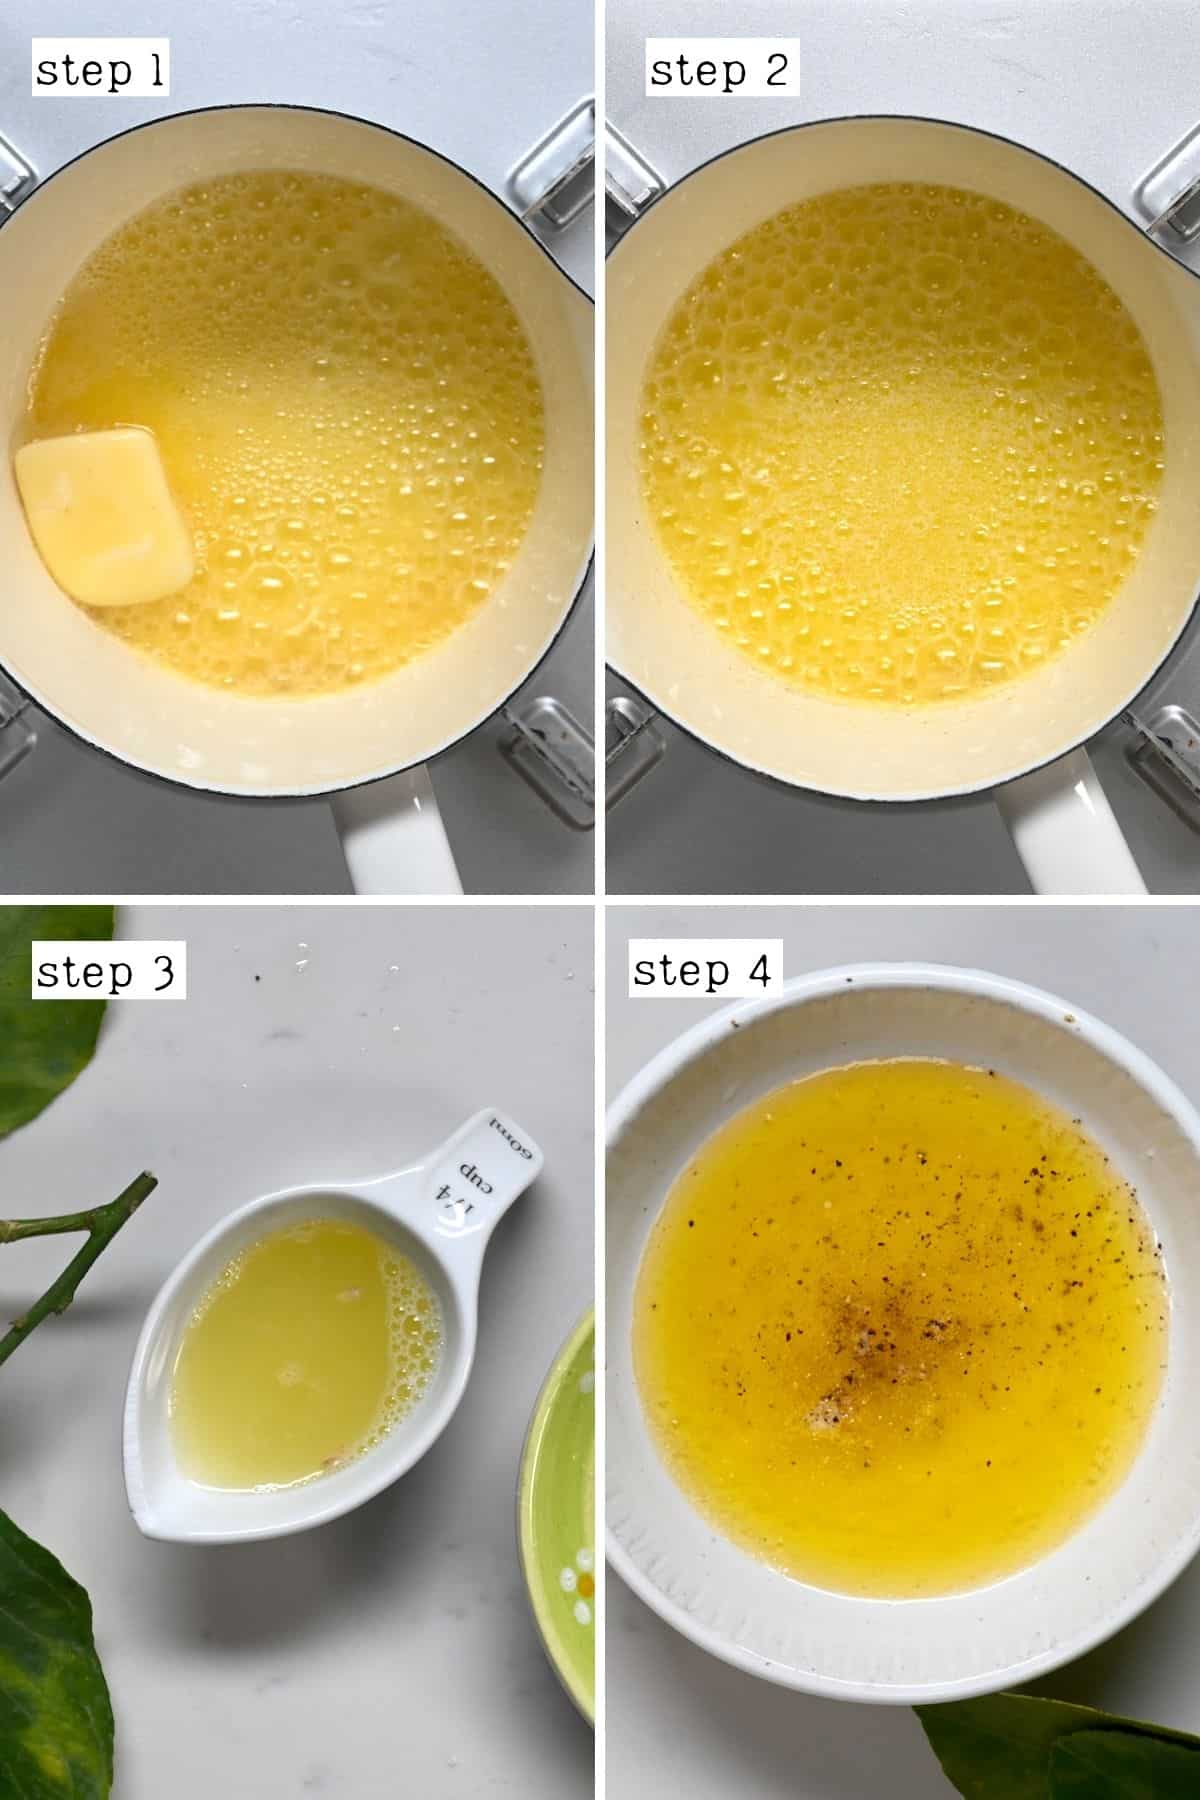
Melt 2 tablespoons of unsalted butter in a microwave-safe bowl (20 seconds). Whisk in 1 tablespoon fresh lemon juice and 1 teaspoon minced garlic until fully emulsified—the mixture should coat the back of a spoon. Pro tip: Use cold butter for slower melting that prevents separation. If garlic burns during melting, start over; bitter notes ruin the delicate fish.
Customize Your Sauce Profile
- For Mediterranean flair: Stir in ½ teaspoon dried oregano and 1 tablespoon chopped Kalamata olives
- Low-sodium option: Replace salt with 2 teaspoons nutritional yeast for umami depth
- Kid-friendly version: Omit garlic and add 1 teaspoon honey for subtle sweetness
Apply Seasoning Layers for Crispness Without Breading
Drizzle exactly 1 teaspoon of the butter-lemon mixture per fillet over the top surface. Watch for the liquid to pool slightly in natural crevices—that’s your flavor anchor point. Immediately sprinkle ¼ teaspoon paprika and ½ teaspoon Italian seasoning per fillet directly onto the wet surface. Key insight: The butter acts as “glue” for dry seasonings, creating a flavor crust without flour or breadcrumbs. Never apply dry spices to raw fish—that causes uneven burning.
Set Air Fryer to 350°F for Precision Cooking
Preheat your air fryer to 350°F (177°C) for exactly 3 minutes. This critical step ensures consistent heat distribution from the first minute. Urgent warning: Cold-starting causes uneven cooking where edges overcook before centers reach 145°F. Verify temperature with an instant-read thermometer placed in the basket—many units run 25°F hot or cold.
Adjust Temperatures for Fillet Thickness
- 1½-inch thick fillets: Reduce to 325°F and add 2 minutes cooking time
- Extra-thin fillets (under ½ inch): Increase to 375°F and check at 6 minutes
- Frozen fillets: Thaw completely first—cooking frozen causes exterior burning
Cook Flounder for 8-10 Minutes With Perfect Timing
Place foil-wrapped fillets in the basket with 1 inch between pieces. Cook at 350°F for 8 minutes for standard 1-inch fillets. Rotate the basket halfway through for even crisping—this compensates for hot spots in most units. At 6 minutes, peek for visual cues: edges should turn opaque white while centers remain slightly translucent.
Identify Doneness by These Foolproof Signs
- Texture test: Gently press center with finger—it should spring back firmly
- Color shift: Translucent pink fades to uniform pearly white
- Edge crisping: Slight golden browning appears along perimeter
- Internal temp: 145°F (63°C) at thickest part (non-negotiable for safety)
Test for Doneness Without Overcooking
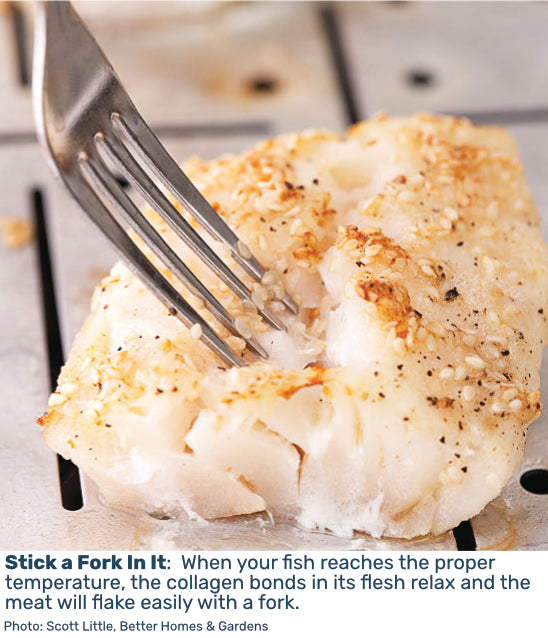
Insert a thin fork tine into the thickest part at a 45-degree angle. Twist gently—if perfectly cooked, the fish separates into clean, moist flakes that don’t cling stubbornly to the fork. Critical indicator: No translucent streaks should remain when you pull flakes apart. If resistance feels like rubber, it’s overdone. Undercooked fish appears shiny and cool in the center.
Avoid These Costly Errors
- Peeking too often: Each basket opening adds 45 seconds to cooking time
- Crowding the basket: Causes steaming instead of crisping—cook in batches
- Ignoring carryover cooking: Fish rises 5-10°F after removal—pull at 140°F
Garnish for Restaurant-Worthy Presentation
Transfer fillets to warm plates immediately using your foil sling—delaying causes steaming and sogginess. Squeeze ½ fresh lemon wedge over each portion just before serving; the acidity cuts through richness without overpowering. Pro move: Hold the wedge 6 inches above the fish for even juice distribution.
Elevate with These Finishing Touches
- Herb confetti: Sprinkle 1 teaspoon finely minced parsley over lemon juice
- Umami boost: Dust with ¼ teaspoon nutritional yeast for “cheesy” notes
- Crunch contrast: Top with 1 tablespoon toasted pine nuts per fillet
Prevent Sticking With Smart Air Fryer Tactics
Line the basket with perforated parchment (holes punched every ½ inch) instead of solid foil. This maintains airflow while creating a non-stick surface. Genius hack: Lightly mist parchment with avocado oil spray—this withstands high heat better than olive oil. If using foil, crumple it slightly before flattening to create microscopic ridges that reduce contact points.
Rescue Stuck Fillets Without Damage
- Cool slightly: Wait 90 seconds after cooking for proteins to release
- Slide technique: Glide a fish spatula under the foil edge, not the fish
- Emergency fix: Pour 1 tablespoon hot water into the basket to create steam lift
Store Leftovers for Next-Day Perfection
Cool flounder completely on a wire rack (15 minutes) before storage—trapped steam makes it mushy. Place in airtight containers with parchment paper between layers. Refrigerate up to 72 hours (not 3 days—quality degrades rapidly after day 2). For freezing, wrap each fillet individually in beeswax wrap before placing in freezer bags—this prevents freezer burn better than plastic.
Reheat Without Drying Out
- Air fryer method: 325°F for 3 minutes on a foil sling
- Oven revival: 300°F on a parchment-lined tray for 8 minutes
- Never microwave: Vibrations destroy delicate flake structure
Clean Air Fryer in Under 5 Minutes
While the basket is still warm (not hot), remove foil with any stuck bits. Wipe interior with a vinegar-dampened paper towel—this dissolves grease without harsh scrubbing. For stubborn residue, fill the basket with ½ cup hot water and 1 tablespoon baking soda; let sit 5 minutes before wiping. Time-saver: Always line with foil during cooking—discard it post-meal for zero scrubbing.
Scale Recipe for Family-Sized Batches
For 4+ fillets, cook in staggered batches rather than overcrowding. Arrange first batch in a single layer with 1-inch spacing. After removing cooked fish, let the air fryer reheat 2 minutes before adding the next batch. Proportion rule: Add 1 minute per additional fillet beyond the first two, but never exceed 12 minutes total to prevent dryness.
Mastering flounder in air fryer no breading transforms this delicate fish into a weeknight hero. You’ve learned how to leverage butter as a flavor carrier, identify precise doneness cues, and prevent common pitfalls like sticking or dryness. No more soggy coatings or oil splatters—just clean, flaky fish with crispy edges in record time. For your next dinner, skip the breading station and let the air fryer highlight flounder’s natural elegance. Serve with roasted asparagus and a crisp white wine to complete the effortless gourmet experience. The secret isn’t complicated technique—it’s trusting the fish to shine on its own.


