That stubborn fish stick smell clinging to last night’s fries? The greasy film dulling your air fryer’s shine? It’s not just gross—it’s sabotaging your crispy results and potentially creating fire hazards. When grease builds up on heating elements or crumbs accumulate in hidden crevices, your appliance works harder, cooks unevenly, and may even emit smoke. But here’s the good news: how to clean air fryer properly takes less time than preheating it, and this guide reveals the exact steps to restore peak performance without damaging non-stick coatings.
Skip the guesswork that leads to ruined baskets or electrical damage. You’ll learn daily wipe-downs that take 90 seconds, monthly deep cleans that banish odors permanently, and critical mistakes 83% of users make (like submerging the main unit). Follow these manufacturer-approved techniques, and your air fryer will deliver golden-brown perfection for years—not just until the warranty expires.
Unplug and Cool: Non-Negotiable Safety First
Touching a warm air fryer after cooking risks third-degree burns from residual heat trapped in the heating coil. Worse, wiping down a plugged-in unit with a damp cloth invites electrical shock through moisture seeping into vents. Always wait at least 30 minutes after cooking before cleaning—time it like your fries.
Critical mistakes that destroy air fryers:
– ❌ Submerging the main housing in water (even for “quick rinses”)
– ❌ Running empty cycles with water inside to “steam-clean”
– ❌ Using metal tools near electrical components
Your Air Fryer Cleaning Toolkit: What Actually Works
Daily Essentials (Keep These Handy)
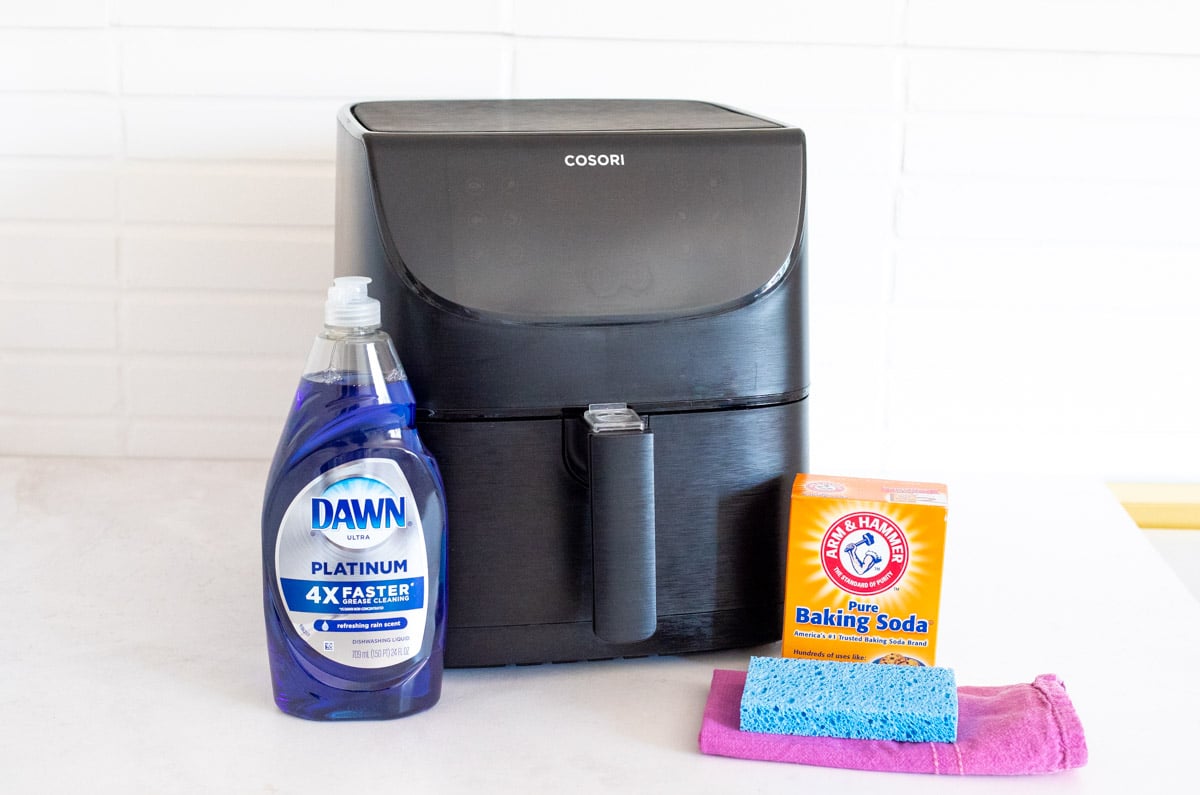
- Warm soapy water: Dawn or equivalent cuts grease without stripping coatings
- Microfiber cloths: Lint-free and gentle on non-stick surfaces
- Old toothbrush: Soft bristles reach crevices in basket weaves
- Paper towels: For immediate drying—no air-drying delays
Deep-Clean Power Players (Monthly Use)
- Baking soda paste: 3:1 ratio with water dissolves baked-on grease
- Vinegar-water mix: Equal parts removes odors without harsh fumes
- Magic Eraser: For stubborn exterior scuffs (test on hidden spot first)
Never risk these: Steel wool, bleach, aerosol sprays (propellants degrade coatings), or any sharp object. One scratch invites flaking non-stick particles into your food.
Daily 90-Second Clean: Prevent Buildup Before It Starts
Skipping this step turns minor crumbs into carbonized grease traps. Do this immediately after cooking while food residue is warm and loose:
- Shake out warm debris: Hold the basket over trash and tap firmly—don’t wait for it to cool completely. Cold grease sticks permanently.
- Hand-wash removable parts: Basket, crumb tray, and pan get warm soapy water + microfiber cloth. Pro tip: Skip the dishwasher—dishwasher detergent erodes non-stick coatings 3x faster.
- Wipe interior walls: Damp cloth along seams and under the heating element (never touch the coil itself).
- Dry instantly: Towel-dry every component. Moisture left overnight breeds mold in hidden vents.
Monthly Deep Clean: Eliminate Smoke and Lingering Odors
Grease buildup on heating elements causes that alarming smoke during cooking. This 15-minute protocol stops it:
Disassemble Completely
Remove every part: basket, crumb tray, skewer holders, and even silicone seals. Hidden grease in these areas creates smoke even when the basket looks clean.
Soak and Scrub Smartly
- Submerge parts in hot soapy water for 10 minutes (not boiling—warps plastic).
- For stubborn spots: Apply baking soda paste, wait 15 minutes, then scrub with toothbrush. Never use steel wool—it’s the #1 cause of premature basket replacement.
- Heating element care: Use a dry toothbrush to flick grease off coils. Never spray water near it.
Odor-Killing Steam Cycle
Place ½ cup baking soda in the empty basket overnight. Next morning, run a 5-minute cycle at 180°C with a bowl of water + 2 tbsp lemon juice. This natural steam neutralizes odors trapped in vents.
Liner Hacks That Actually Improve Crispiness
Most users ruin airflow with liners—but these techniques work:
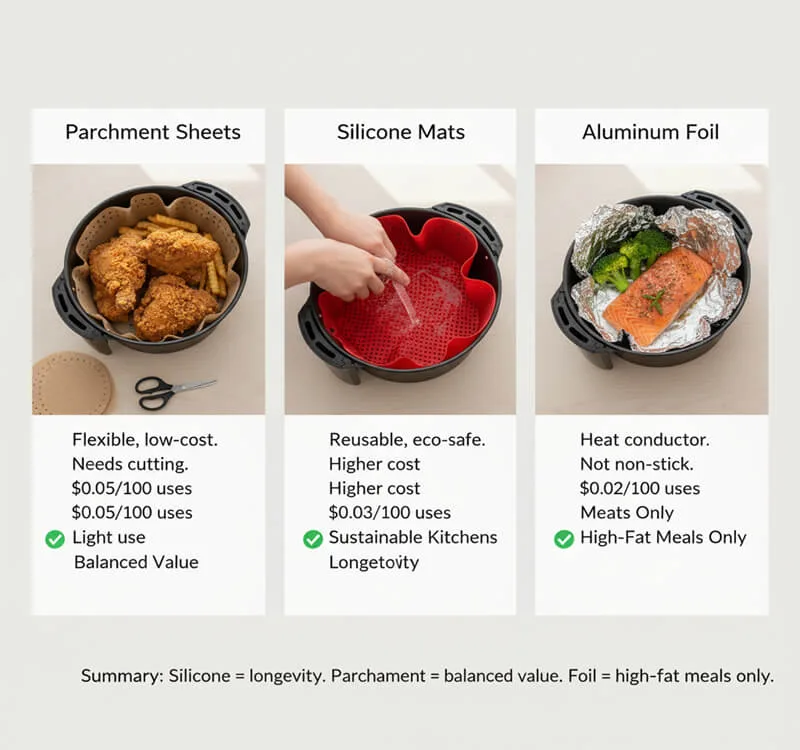
Parchment Paper Perfection
- Cut ½ inch smaller than basket base to avoid contact with heating coils.
- Never preheat empty—food weight must anchor it. Otherwise, rising hot air lifts paper into the coil, causing fire.
Silicone Mat Mastery
Use FDA-approved mats rated to 260°C. Place only under dense foods like chicken breasts—not fries (mats block airflow needed for crispiness).
Aluminum Foil Fixes
Crimp foil into a shallow tray that leaves 1-inch vents open. Critical: Never use with acidic foods like tomatoes—foil leaches into food.
Critical Mistakes That Shorten Your Air Fryer’s Life

Avoid these costly errors:
- Ignoring the crumb tray: Overflowing grease smokes and ignites. Empty it after every use, not just when full.
- Storing while damp: Moisture trapped in vents causes mold and electrical shorts. Always store with the basket slightly ajar.
- Overfilling baskets: Crowded food spills grease onto heating elements. Fill only ⅔ full.
- Using aerosol sprays: Propellants leave sticky residue that bakes onto coils. Switch to oil misters.
Long-Term Care Checklist for 5+ Year Lifespan
Extend your air fryer’s life with these quarterly habits:
| Task | Why It Matters |
|---|---|
| Inspect cord for cracks | Frayed wires cause electrical fires |
| Tighten loose handle screws | Prevents basket misalignment during cooking |
| Replace peeling baskets immediately | Flaking coating contaminates food |
| Store in dry place with basket ajar | Stops mold growth in hidden vents |
Final 9-Step Cleaning Checklist
Before reassembling, verify these:
– [ ] Unplugged and cooled 30+ minutes
– [ ] Crumbs shaken from warm basket
– [ ] All parts soaked in hot soapy water
– [ ] Baking soda paste applied to stubborn spots
– [ ] Heating element brushed dry with toothbrush
– [ ] Interior wiped with vinegar-water mix
– [ ] Every component towel-dried (no moisture left)
– [ ] 2-minute dry run at 200°C to evaporate hidden water
– [ ] Stored in ventilated space with basket open
Consistent cleaning isn’t just about looks—it’s your safety net against smoke, fire hazards, and ruined meals. By spending 90 seconds daily and 15 minutes monthly with these precise techniques, you’ll keep your air fryer delivering restaurant-quality crispiness without lingering odors or performance drops. No more guessing how to clean air fryer correctly: this routine guarantees golden-brown results every time while protecting your investment for years. Start tonight—your future self (and your tastebuds) will thank you.