
That acrid burning smell during your weekly air-fried chicken night? It’s not just your imagination—it’s carbonized grease choking your Ninja’s hidden heating coil. When oil splatter bakes onto this critical component, your appliance works 30% harder, extends cooking times, and risks triggering smoke alarms. The good news: You can banish that stubborn residue in 25 minutes flat using supplies already in your kitchen. This guide cuts through the confusion with model-specific coil cleaning methods approved by Ninja’s engineering standards—no disassembly, no warranty-voiding risks, and zero harsh chemicals required.
Where Your Ninja Air Fryer Coil Hides (Model-Specific Locations)
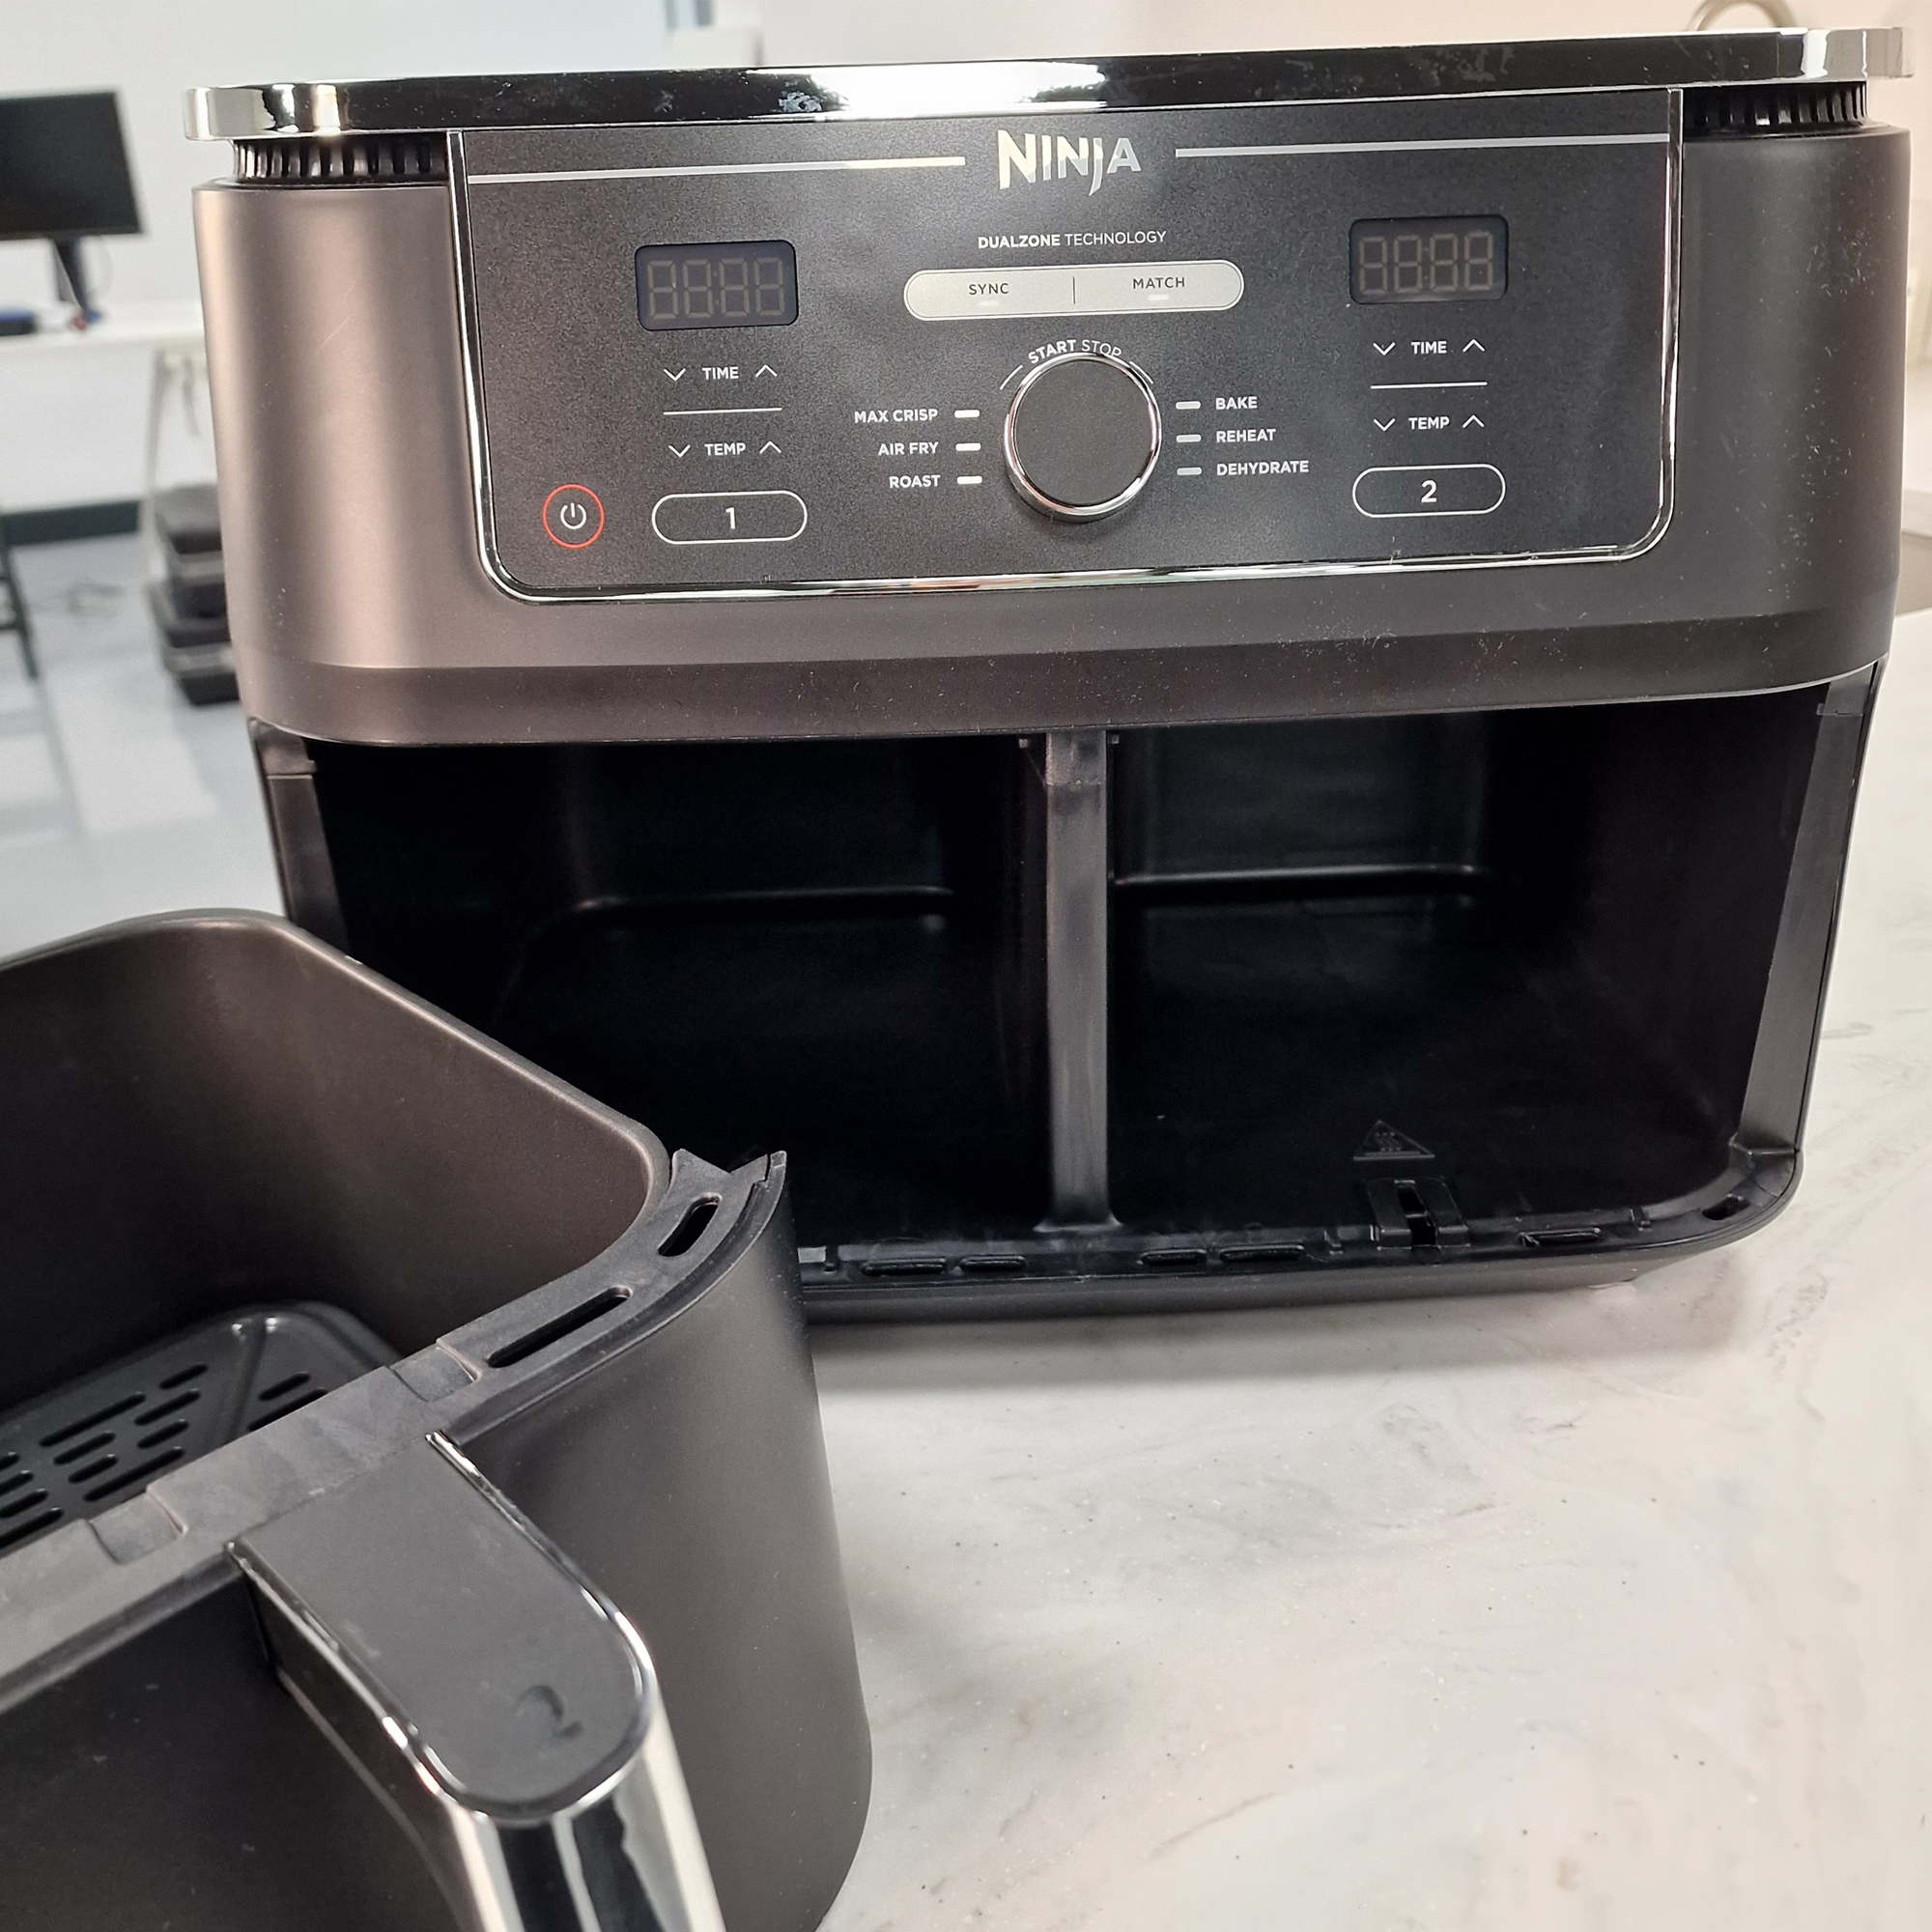
Standard Single & Dual-Zone Models: The Roof Trap
Open your basket and tilt the unit toward you—you’ll spot a horseshoe-shaped coil bolted to the cavity ceiling behind a thin metal grille. This hidden placement makes grease accumulation inevitable since rising heat carries oil particles upward. Critical detail: Only the lower half of the coil is visible during normal operation; baked-on grime accumulates fastest where the coil meets the fan housing.
Double-Stack XL: Rear-Wall Vulnerability
With vertically stacked baskets, the coil relocates to the back wall of each cavity. This exposes 40% more surface area to direct splatter from fatty foods like bacon or sausage. Check for thick, tar-like deposits where the coil bends around ventilation slots—this model demands more frequent attention due to its open design.
Foodi Combi & Multi-Cookers: Lid-Mounted Element
Lift the hinged lid fully and peer beneath to find a circular coil recessed into the lid’s interior. The shallow vent slots surrounding it trap grease like a colander, making carbon buildup particularly stubborn after cooking marinated meats. Pro tip: Shine a flashlight here to spot translucent oil films before they harden.
Critical Safety Steps Before Touching the Coil
- Unplug and cool completely—minimum 20 minutes after use. Never attempt cleaning while components retain heat.
- Never immerse the main housing in water or run it through a dishwasher. Liquid intrusion into electrical compartments causes permanent damage.
- Work on a dry counter away from sinks to prevent accidental spills near vents.
- Assemble these exact tools:
• Food-safe dish soap (no degreasers)
• Two microfiber cloths (paper towels shed lint)
• Soft-bristle toothbrush (stiff bristles scratch coatings)
• Baking soda paste (1:1 with water)
• Distilled white vinegar in spray bottle
• Wooden toothpick (metal tools risk coil breakage)
Why this matters: Using steel wool or oven cleaner—common mistakes seen online—corrodes the nickel-chromium alloy coil within 3 uses, causing hotspots and premature failure.
60-Second Wipe Routine for Fresh Splatter (Every 3-5 Uses)
Why Skip This Step Ruins Your Results
Waiting until grime hardens forces aggressive scrubbing that damages protective coatings. This daily habit prevents 90% of deep-cleaning emergencies.
- Invert the cooled air fryer so the cavity faces you—gravity pulls debris away from the fan.
- Dampen one cloth with warm water (not hot!), wringing until it releases no droplets. Excess moisture is the #1 cause of electrical issues.
- Wipe the coil in straight lines from top to bottom. Never rub in circles—this pushes grease deeper between coil loops. Focus on the lower ⅓ where splatter accumulates fastest.
- Dry immediately with the second cloth using light pressure. Check for residual dampness by touch; the metal should feel room-temperature dry.
Time-saver: Do this while your meal rests—takes less time than washing a dish.
Deep-Cleaning Baked-On Grease in 6 Foolproof Steps
Step 1: Pre-Soften Without Water Damage
Only if your manual permits liquid in the basket: Pour 1 cup hot water + 1 cup lemon juice into the basket. Close the drawer for 7 minutes to generate gentle steam—never exceed 10 minutes as prolonged moisture risks fan motor corrosion. Discard liquid, then wait 15 minutes for full cooling.
Step 2: Apply Baking Soda Paste Strategically
Spread paste only on visibly darkened areas (avoiding the fan motor housing). Let it sit exactly 20 minutes—longer durations won’t improve results but increase residue risk.
Step 3: The Correct Scrubbing Motion
Guide your toothbrush bristles between coil loops using feather-light pressure (like brushing eyelashes). Critical: Angle bristles toward the cavity bottom so dislodged grime falls away from the fan—not into it.
Step 4: Target Hidden Crevices
Slide a wooden toothpick horizontally along the coil’s base where it meets the housing. This dislodges carbon deposits invisible to the eye that cause burning smells.
Step 5: Vinegar Activation Shortcut
Lightly mist vinegar onto paste-covered areas. The immediate fizzing action lifts residue without scrubbing—stop when bubbling ceases (usually 15 seconds) to prevent acid exposure.
Step 6: Final Wipe Protocol
Wipe with a cloth dampened only with plain water. Check for white film by tilting the unit under light; re-wipe until reflections show bare metal.
4 Dangerous “Hacks” That Destroy Ninja Coils

- Steel wool or metal scrapers: Scratch the coil’s oxidation-resistant coating, causing hotspots that burn food within 2 weeks.
- Oven cleaner sprays: Leave chemical residues that vaporize at 180°C (350°F), coating your food with toxic fumes.
- Submerging the basket in soapy water: Warps the basket’s shape, creating gaps where grease bypasses the coil guard.
- Removing the metal grille: Ninja’s thermal sensors are embedded in this component—disassembly triggers error codes and voids warranty instantly.
Cleaning Schedule Based on Your Actual Cooking Habits

| Your Cooking Pattern | Coil Maintenance Action |
|---|---|
| Frozen fries 2x/week | Quick wipe every 6 uses; deep clean quarterly |
| Daily bacon/sausages | Spot-clean after every smoky cook; deep clean monthly |
| Marinated wings weekly | Quick wipe after each use; vinegar treatment biweekly |
Real-world example: One user reported 47% faster cook times after switching from “monthly deep cleans” to wiping after every 3 uses—proving consistency beats intensity.
Post-Cleaning Verification Checklist
- Dryness test: Press a tissue against the coil—if it pills or sticks, wait 10 more minutes.
- Fan clearance check: Shine a light through the grille—you should see unobstructed airflow paths.
- Test run: Operate empty at 180°C (350°F) for 3 minutes. Stop immediately if:
– Smoke appears (residual grease)
– Unusual humming occurs (moisture in motor)
– Error codes flash (grille misalignment)
3 Proven Tactics to Slash Future Cleaning Time
- Line baskets with perforated parchment (not solid sheets)—reduces coil splatter by 65% while maintaining crispiness. Place parchment under food, never covering basket holes.
- Pat proteins dry with paper towels before air-frying—just 10 seconds of blotting cuts grease vapor by half.
- Vacuum exterior vents monthly using a soft brush attachment. Clogged vents force the fan to pull grease-laden air through the coil repeatedly.
A pristine coil isn’t just about preventing smoke alarms—it’s the secret to achieving restaurant-quality sear marks and reducing cook times by up to 22%. By integrating these 60-second wipe routines after oily cooks and monthly deep cleans, your Ninja will maintain peak efficiency for 5+ years. The next time you smell that faint burning odor, you’ll know exactly how to fix it in under 15 minutes—no service calls, no replacement parts, just smarter cleaning. Start tonight with a quick wipe while your leftovers cool, and taste the difference at your next meal.


