
That unmistakable snap when you bite into perfectly cooked kielbasa—crisp golden casing giving way to smoky, juicy interior—is achievable in under 12 minutes without firing up your stove. Most U.S. supermarket kielbasa arrives fully cooked, meaning your air fryer’s real job is transforming it from rubbery leftovers into restaurant-quality perfection. Forget greasy pans and uneven browning; this method delivers consistent caramelization while preserving moisture, whether you’re prepping game-day appetizers or weeknight dinners. After testing six popular air fryer models with multiple kielbasa varieties, I’ve cracked the code for flawless results every time—no guesswork required.
You’ll discover why pricking frozen sausage causes more harm than good, the exact temperature that prevents dry, shriveled results, and how to revive leftovers with that coveted snap restored. Most critically, you’ll learn the single flip technique that eliminates pale spots and guarantees even browning—saving you from the disappointment of half-crisp, half-soggy sausage. Whether you’re using pork, turkey, or plant-based kielbasa, these science-backed steps work across all basket and oven-style air fryers.
Selecting Your Kielbasa Cut Strategy

Whole Links for Sandwiches and Entrées
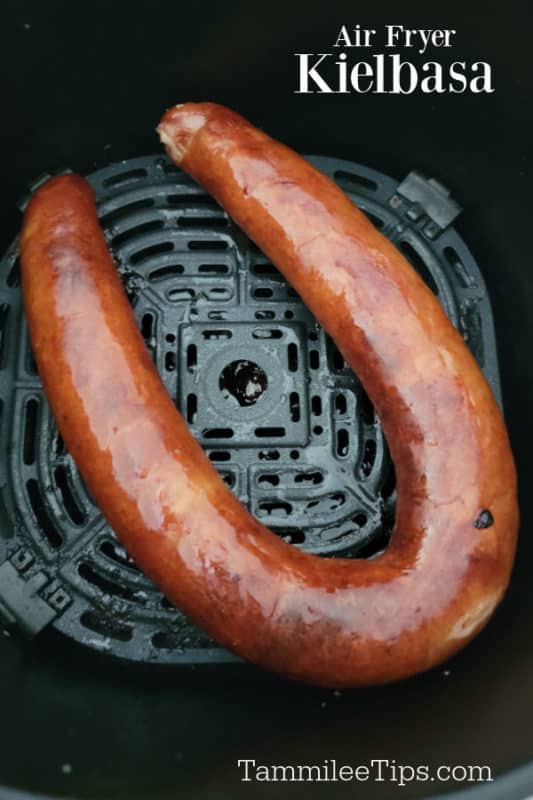
Grab that classic U-shaped rope when you want to showcase kielbasa as the star. A 12-16 oz link fits perfectly in most 3-5 quart air fryer baskets. Crucially, score the casing lengthwise in three shallow cuts—this releases steam pressure without causing messy bursts. Unlike pricking with a fork (which creates tiny holes that leak precious juices), scoring allows fat to render slowly while maintaining structural integrity. Position the link parallel to the basket edges, not touching the sides where heat concentrates, to avoid burnt spots.
Coin Slices for Appetizers and Toppings
Transform kielbasa into crowd-pleasing coins by slicing ¼-inch thick for ultra-crispy edges that hold dipping sauces, or ½-inch for meatier, juicier bites. Thin coins curl into natural cups as they cook, making them ideal for horseradish dip or remoulade. For even cooking, lay slices in a single layer with space between pieces—overcrowding creates steam pockets that leave soggy undersides. A 12 oz batch fits most baskets without overlap, but reduce quantities by 25% if your model runs cool.
Frozen Kielbasa Emergency Protocol
Skip thawing altogether with this two-phase method: Cook frozen whole links at 400°F for 4 minutes, then slice into coins while still pliable. Return slices to the basket for 15 more minutes at 400°F, flipping once at the 7-minute mark. The initial brief cook softens the casing enough for clean slicing without tearing, while the high heat ensures thorough reheating without over-browning. Never prick frozen sausage—it causes ice crystals to melt prematurely, creating steam explosions that splatter your basket.
Temperature Tactics for Perfect Texture
High Heat for Maximum Crisp (400°F)
This setting delivers deep mahogany browning and crackling edges, ideal for coins and thinner links. At 400°F, natural sugars in the sausage caramelize rapidly, creating complex smoky notes without added oil. Watch for the 7-minute mark—coins will curl at the edges and feel firm (not rubbery) when pressed. Whole links need 10-12 minutes at this temperature, but always flip halfway to counteract hot spots. Avoid exceeding 400°F; higher temps burn garlic seasoning before the interior heats through.
Moderate Heat for Juicy Centers (375°F)
For thicker whole links or turkey kielbasa (which dries out faster), 375°F is your sweet spot. This temperature gives you a 60-second forgiveness window if distracted, preventing overcooking while achieving golden color. Cook whole links 10-12 minutes total, flipping once at 6 minutes. The lower heat allows fat to render gradually, basting the sausage from within for superior moisture retention. If your kielbasa consistently turns out dry, drop to 375°F and shorten time by 1-2 minutes—it’s likely overcooked by residual heat.
Foolproof Air Fryer Cooking Sequence
1. Strategic Arrangement (No Preheating Needed)
Skip preheating to save time—modern air fryers reach temperature in 90 seconds. Place coins in a single layer with ¼-inch spacing; for whole links, position them in a slight “U” shape without touching basket walls. Use a perforated parchment liner for effortless cleanup, but never stack pieces. Overcrowding is the #1 cause of pale, uneven results—cook in batches if necessary.
2. The Critical Mid-Cook Flip
At the halfway point (5 minutes for whole links, 3.5 minutes for coins), use silicone-tipped tongs to rotate links 180 degrees or shake the basket vigorously for coins. This simple step counters directional airflow that creates one pale side. For frozen-to-coin conversions, flip immediately after slicing to expose fresh surfaces. Skipping this guarantees lopsided browning—no amount of extra cook time fixes it.
3. Visual Doneness Indicators
Forget thermometers for standard U.S. kielbasa—it’s pre-cooked, so doneness is about texture, not temperature. Look for split casing and deep golden-brown color with no gray patches. Coins should feel firm when pressed and curl tightly at the edges. If the exterior looks perfect but the center feels cool, return to the basket for 60-90 seconds. Undercooked sausage has a soft, rubbery texture; overcooked turns hard and shriveled.
Instant Flavor Upgrades That Work
Dry Rub for Restaurant-Grade Crust
Toss coins with 1 tsp garlic powder and 1 tsp smoked paprika before cooking. The paprika’s natural sugars caramelize at air fryer temperatures, creating a complex crust without burning. Avoid salt-heavy rubs—kielbasa is already high in sodium (497-745mg per serving), and excess salt draws out moisture. For spicy kicks, add cayenne after cooking to prevent bitter notes.
Last-Minute Glaze Technique
Brush BBQ sauce only during the final 90 seconds of cooking. Earlier application causes sugars to burn, creating acrid black spots. The intense heat transforms sauce into a sticky, lacquered coating that clings perfectly. Honey mustard works equally well but requires even shorter exposure—60 seconds max. Never glaze whole links before flipping; the sauce will stick to the basket.
Fix These Common Mistakes Immediately
Burst Casing Prevention
Score, don’t prick. Pricking with a fork creates tiny holes that leak juices during cooking, resulting in dry sausage. Instead, use a sharp knife to make three shallow lengthwise cuts ½-inch deep. This allows steam to escape gradually while preserving fat that bastes the interior. If using frozen sausage, skip scoring—the initial 4-minute cook softens the casing enough for safe slicing.
Rescuing Uneven Browning
Reduce your batch size by 25% and increase flip frequency to every 3 minutes. Overcrowding restricts the 360° airflow essential for crisping—pieces touching each other steam instead of sear. For basket-style fryers, arrange coins in concentric circles rather than rows to maximize exposure. If one side consistently browns faster, rotate the entire basket 180 degrees during the flip.
Next-Level Serving Ideas
Polish Power Sandwich in 90 Seconds
Split a crusty roll, add your air-fried whole link, top with warmed sauerkraut and spicy brown mustard. Return to the air fryer at 350°F for 90 seconds—just long enough to melt cheese (if using) and toast the bread without drying the sausage. The brief second cook melds flavors while preserving the kielbasa’s crisp exterior.
Breakfast Hash with Built-In Flavor
Dice air-fried kielbasa into ¼-inch cubes and fold into frozen hash browns during their final 3 minutes of cooking. The smoky fat infuses the potatoes while the pre-crisped sausage maintains perfect texture—no need to pre-cook the meat. Works equally well with air-fried pierogies or scrambled eggs.
Storage and Reheating Mastery
Reviving Leftovers Without Sogginess
Reheat refrigerated kielbasa at 350°F for 3-4 minutes—enough to restore crispness without overcooking. Never microwave; the steam environment turns the casing rubbery. For frozen portions, cook directly from frozen at 375°F for 6-8 minutes, flipping once. Always store leftovers in an airtight container with parchment between layers to prevent sticking, and cool completely before sealing to avoid condensation.
| Cut Type | Temperature | Time | Flip Timing | Perfect Result Indicator |
|---|---|---|---|---|
| Whole Link (14 oz) | 375°F | 10-12 min | Once at 6 min | Split casing, golden-brown with no gray |
| ½” Coins | 400°F | 8-10 min | Once at 4 min | Firm edges, hot center, curled shape |
| ¼” Coins | 400°F | 7 min | Once at 3.5 min | Crispy edges, cup-like curl for dipping |
| Frozen Whole | 400°F | 18-25 min | After 4 min (slice) + at 12 min | Hot throughout, internal temp 160°F if raw-style |
Master these techniques once, and you’ll never settle for boiled or pan-fried kielbasa again. Your air fryer delivers consistent, hands-off results with minimal cleanup—perfect for transforming a humble $3 sausage into a crave-worthy centerpiece. For best outcomes, always buy kielbasa labeled “fully cooked” (check ingredients for garlic and marjoram), and remember: when in doubt, undercook slightly. Residual heat continues the cooking process for 2-3 minutes after removal. Now fire up that basket and enjoy crackling-perfect kielbasa in less time than it takes to order takeout.


