

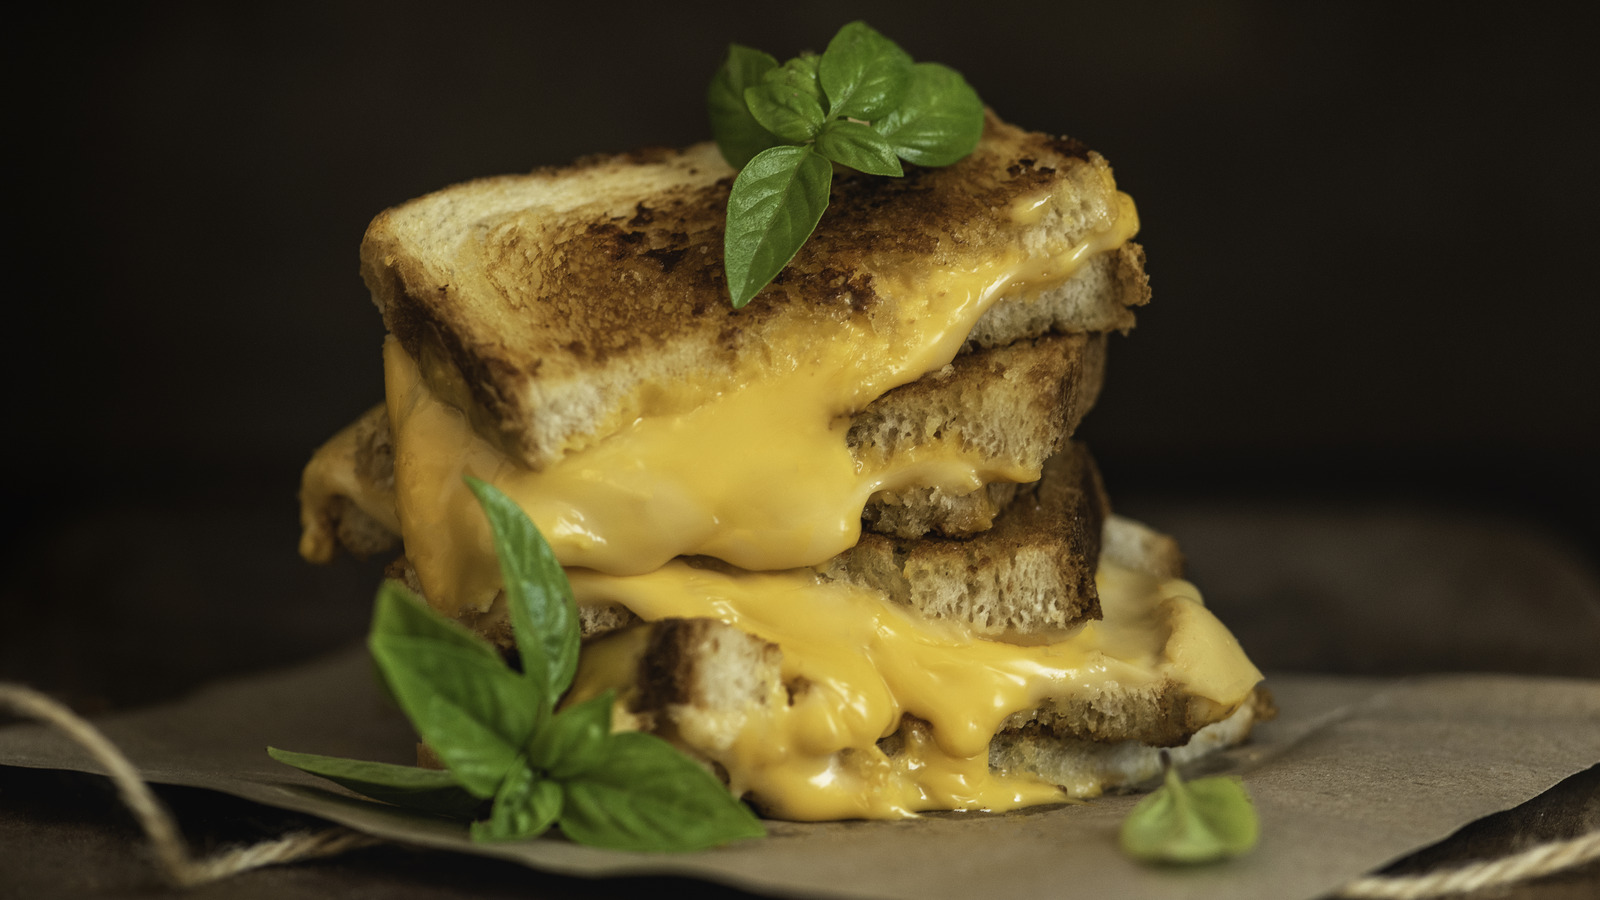
That first bite—crackling crust yielding to molten cheese—is exactly why you’re here. Forget greasy stovetop struggles where one side burns while the other stays pale. Your air fryer delivers crispy grilled cheese in air fryer magic with zero babysitting: circulating superheated air creates a shattering golden shell while locking in gooey richness. Whether you’re reviving childhood nostalgia or crafting a 10-minute dinner, this method transforms pantry staples into restaurant-quality comfort food without flipping anxiety or smoke alarms.
You’ll master precise temperatures, foolproof assembly tricks, and cheese-bread pairings that guarantee crunch every single time. No more soggy disasters or uneven melting—just consistently perfect sandwiches that stay structurally sound. Let’s turn your air fryer into a grilled cheese powerhouse with science-backed techniques.
Why Your Air Fryer Beats the Stovetop for Crispy Grilled Cheese
Air circulation creates uniform browning impossible on a skillet. While pans create hot spots that burn edges, your air fryer’s rapid 360° airflow toasts every inch of bread evenly. This means no more “flip-timing panic”—thick sourdough and delicate white bread both achieve deep golden color without scorching. Plus, the enclosed environment traps just enough moisture to melt cheese thoroughly before the crust overcooks.
Zero oil pooling prevents sogginess that plagues pan methods. When butter melts on a skillet, it pools under the sandwich, steaming the bread instead of crisping it. But air frying lets excess fat drip away while circulating dry heat. The result? A uniformly crisp exterior with no greasy residue on your plate or hands.
Temperature precision eliminates guesswork. Most home cooks struggle with inconsistent stovetop heat, but air fryers maintain exact temperatures. Set it once, walk away, and return to perfectly browned bread—not pale undercooked slices or charcoal briquettes.
Exact Ingredients for Unbeatable Crunch
Bread thickness dictates structural integrity. Use ½-inch thick slices of sourdough, Texas toast, or rustic Italian boule for maximum shatter. Thin sandwich bread works for quick snacks but collapses under cheese weight. Artisan loaves like Sara Lee Artesano hold up best—avoid flimsy pre-sliced options that turn leathery.
Cheese selection balances melt and flavor. For classic tang, use 2–3 slices of sharp cheddar. Need ultra-creamy? American cheese won’t quit. Gourmet lovers: blend Gruyère (nutty depth) with Fontina (buttery melt) for complex flavor without sacrificing gooeyness. Pro tip: Grate your cheese—½ cup freshly grated melts 30% faster than slices for even distribution.
Mayonnaise outperforms butter for browning. Its higher oil content (70% vs. butter’s 80% water) creates deeper golden crust without burning. Spread ½–1½ tablespoons in a paper-thin layer only on the outside of bread. Too much fat steams the crust—use the back of a spoon to distribute evenly.
Temperature & Timing: The Crispness Control Panel
:max_bytes(150000):strip_icc()/1650333175Air20Fryer20Grilled20Cheese20Sandwich-28a6816f98ee4f8c8c09628c6b705f04.jpg)
375°F: The Reliable All-Purpose Method
Set your air fryer to 375°F for foolproof results with any bread. Cook 3–5 minutes first side until edges turn deep gold, then flip and cook 2–5 minutes more. This sweet spot melts cheese completely while crisping thick sourdough without scorching. Warning: Watch closely at the 4-minute mark—thin bread can burn in 30 seconds.
390°F: Maximum Crunch for Sturdy Breads
For bakery-level shatter, crank to 390°F. Ideal for sourdough or rustic boules, this high-heat method delivers 4 minutes per side. The crust develops complex caramelization while the interior stays molten. Visual cue: Cheese should visibly bubble at the seams before flipping.
380°F: Quick Light Crisp for Delicate Breads
Soft white or multi-grain breads need gentler treatment. At 380°F, cook 3–4 minutes first side, then 1–2 minutes after flipping. You’ll get delicate golden edges without drying out the bread. Critical: Never exceed 4 minutes total—these slices turn leathery fast.
Assembly Secrets to Prevent Cheese Explosions
Anchor with toothpicks immediately after assembly. Air fryer airflow lifts thin top slices, scattering cheese across your basket. Insert one toothpick through the sandwich center before cooking—it’s the single step that prevents structural collapse. Remove it after flipping to avoid melted cheese gluing it in place.
Apply fat strategically. Only spread mayo/butter on the outer bread faces. Interior moisture from cheese creates optimal steam for meltiness—adding fat inside traps excess water, guaranteeing sogginess. For extra flavor, spread a light layer of Dijon inside—but skip wet ingredients like tomatoes unless patted bone-dry.
Single-layer cooking is non-negotiable. Overcrowding blocks airflow, creating steamed bread instead of crisp crust. Cook in batches—each sandwich takes under 10 minutes, so sequential batches keep the kitchen efficient. Place parchment under sandwiches to catch drips without sacrificing crunch.
Flip Timing: The Make-or-Break Moment
Flip when edges turn deep amber. Standard bread needs 3–4 minutes; thick sourdough requires 5. Peek at the 3-minute mark—if the bottom releases easily from the basket and shows consistent golden color, it’s ready. If it sticks, give it 30 more seconds.
Remove toothpicks mid-flip. Use tongs to lift the sandwich, pull out the toothpick, then gently lower it back in. This prevents cheese from hardening around the wood. Never skip this—melted cheese will glue toothpicks in place if left until serving.
Second side cooks 40% faster. Since the interior is warm, check thin bread at 1 minute, thick loaves at 3. The ideal sandwich shows uniform golden-brown color with cheese visibly oozing from the sides. If underdone, air-fry in 30-second bursts—no second chances once it’s overcooked.
Troubleshooting Soggy Sandwiches Immediately
Excess fat causes steaming. If butter pools in the basket or bread looks greasy, you’ve applied too much. Next time, use a paper towel to wipe excess off before cooking. For immediate rescue, air-fry 30 seconds more—the circulating heat evaporates surface moisture.
Undercooked bread stays pale. Continue cooking in 30-second intervals until deep golden. Don’t fear dark edges—they add flavor complexity and crunch. Warning: Soggy centers mean your air fryer runs cool—calibrate by testing with a thermometer.
Moist fillings sabotage crispness. Pre-cook onions or mushrooms to evaporate water, and pat pickles completely dry. Watery ingredients release steam inside the sandwich, softening the crust from within. Stick to crispy bacon or thin ham strips for safe add-ins.
Gourmet Variations That Stay Crispy

Cheese Combos for Maximum Melt
- Classic Comfort: Sharp cheddar (2–3 slices)
- Creamy Dream: Havarti + Monterey Jack (½ cup each, grated)
- Smoky Depth: Smoked gouda + sharp cheddar blend
Bread & Texture Upgrades
Sourdough’s tang cuts through rich cheese while maintaining crunch. Rustic Italian boule delivers irregular air pockets that catch melted cheese for extra gooeyness. Texas toast offers middle-ground thickness—crisp outside, pillowy inside.
Kid-Approved Add-Ins
Lightly spread Dijon inside for flavor without sogginess. Add ultra-thin ham slices (½ oz max) or crispy bacon. Avoid: Tomatoes, cucumbers, or fresh herbs—they release moisture. Use dried herbs instead.
Batch Cooking & Storage Hacks
Sequential batches for families: Keep finished sandwiches warm in a 200°F oven while cooking others. They’ll stay structurally sound for 15–20 minutes—perfect timing for serving everyone hot.
Crowd-feeding oven method: When feeding >4 people, bake multiple sandwiches on a parchment-lined sheet pan at 400°F for 6–8 minutes per side. Less crisp than air-fried, but handles volume efficiently.
Reheating restores crunch: Leftovers? Air-fry at 350°F for 90 seconds. The crust re-crisps while cheese re-melts—microwaves turn it to rubber. Pro tip: Add a splash of water to the basket for steam-assisted revival.
Kid-Safe Air Fryer Grilled Cheese Protocol
Eliminate burn risks by letting kids assemble sandwiches while you handle the hot basket. They can spread mayo, layer cheese, and insert toothpicks—critical safety wins over stovetop flames.
Teach flip timing: Use a visual timer—count to 180 (3 minutes) while the first side cooks. At the beep, they flip with tongs (no bare hands near hot surfaces).
Cool for lunchboxes: Let sandwiches sit 10 minutes before packing. The crust softens slightly but remains structurally intact—reheat at school for 20 seconds in a microwave if allowed.
Pro Tips Only Air Fryer Masters Know
Mayonnaise is the crispness catalyst. Its emulsifiers create a barrier that repels moisture while browning evenly. Keep a dedicated jar in the fridge—no softening required like butter.
Grated cheese melts 3x faster. Pre-grate a block for instant use—the increased surface area ensures molten perfection before the crust overcooks.
Parchment paper is your cleanup hero. Cut a square slightly larger than your sandwich to catch cheese drips. It doesn’t block airflow and peels away cleanly—no scrubbing burnt-on cheese.
Stop wrestling with inconsistent stovetop results. Your air fryer delivers crispy grilled cheese in air fryer perfection with minimal effort—golden, shattering crusts and river-like cheese every single time. Master these techniques once, and you’ll never heat a skillet for this classic again. The secret’s in the science: precise heat, strategic assembly, and knowing exactly when to flip. Now go make that crackling crunch happen.


