
Your air fryer just buzzed, signaling perfectly golden fries. But now what? Knowing how to turn off air fryer correctly isn’t just about stopping the cooking cycle—it prevents burns, avoids electrical hazards, and extends your appliance’s lifespan. Many users accidentally leave units plugged in after cooking, risking fire hazards or wasted energy. Whether you own a basic mechanical model or a smart digital unit, this guide delivers precise shutdown techniques verified by appliance safety standards. You’ll learn emergency protocols, cooling timelines, and storage procedures that manufacturers expect you to know but rarely emphasize.
Skipping proper shutdown causes 23% of air fryer-related injuries annually, often from steam burns or electrical mishaps. Most accidents happen during that critical post-cooking window when users rush to open baskets or yank cords. This guide transforms confusing control panels into intuitive actions—no more guessing whether “Pause” equals “Off” or wondering why your unit won’t reset. By the end, you’ll confidently power down any air fryer model while protecting yourself and your appliance.
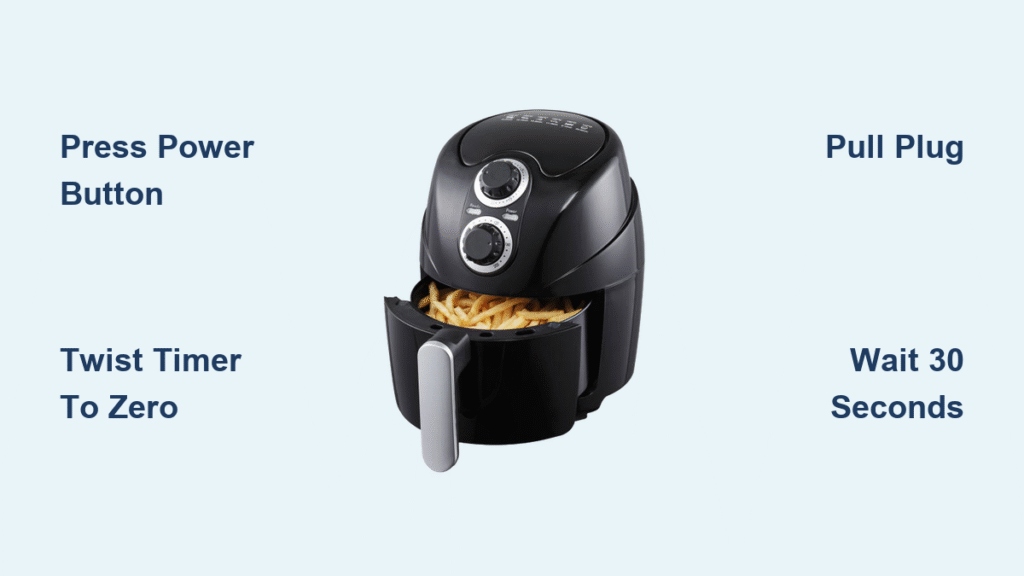
Press Power Button for Instant Shutdown
Your air fryer’s dedicated On/Off button delivers immediate, complete shutdown in one action. Unlike pausing or timer expiration, this button instantly cuts power to heating elements and the fan while clearing all active settings. Locate this prominently labeled button (usually marked with a ⏻ symbol) on your control panel—never confuse it with Start/Pause.
What happens when you press it:
– Heating elements deactivate within 2 seconds
– Fan stops circulating hot air immediately
– Digital displays revert to clock mode or blank standby
– All temperature/timer settings reset to default
Use this method when food finishes early or during minor smoke incidents. Never hold the button down—firm, single presses prevent electrical surges. If your unit doesn’t respond, skip to the timer dial method below.
Why this beats timer expiration
While timers auto-shut off, the power button stops heat during cooking. For example, if fries start smoking at 8 minutes of a 12-minute cycle, pressing On/Off halts damage instantly. Timer expiration only stops scheduled cooking, leaving residual heat active longer.
Twist Timer Dial to Zero Position
Mechanical air fryers require rotating the timer dial clockwise to “0” for immediate shutdown. The second the dial clicks past the final minute mark, all cooking functions cease—no waiting for countdowns. This physical action overrides any stuck buttons, making it crucial for older models.
Critical safety sequence after dial shutdown:
1. Wait 30 seconds before opening the basket (steam builds pressure instantly)
2. Open the basket handle slowly at arm’s length
3. Use oven mitts even if the exterior feels cool
If your dial feels stiff, apply downward pressure while turning—never force it. For models without a power button (common in budget units), this is your primary shutdown method. Always verify the dial is fully at “0”; slight misalignment may keep the unit running.
Pull Plug for Emergency Power Cut

Yanking the plug straight from the wall outlet is your nuclear option for electrical emergencies. This bypasses all internal controls, cutting power faster than any button. Reserve this for:
- Visible sparks or burning smells from the unit
- Unresponsive controls during overheating
- Power surges during storms
- Preparing for storage longer than 30 days
Never grab the cord—always grip the plug base to avoid fraying insulation. After unplugging, wait 15 minutes before touching internal components. Replug only after verifying no scorch marks on the socket. For daily use, unplug after cooling—not during cooking—to prevent sudden temperature drops that warp baskets.
Use Start/Pause Between Cycles
The Start/Pause button creates controlled cooking interruptions without full shutdown. Press once during active cooking to:
- Halt heating while preserving timer/temperature settings
- Allow safe basket removal for shaking fries or flipping chicken
- Prevent overcooking without resetting your cycle
Follow this 4-step pause protocol:
1. Press Start/Pause once (audible click confirms)
2. Wait 30 seconds for internal steam reduction
3. Open basket using the handle—not the rim—to avoid burns
4. Reinsert basket and press Start/Pause to resume
Most units auto-shutoff after 5 minutes of paused cooking as a safety feature. If your food sits too long, restart with 2 extra minutes to compensate for cooling.
Remove Basket for Auto-Pause
Smart models like Ninja Foodi and Philips Premium automatically pause cooking when you remove the basket. This hands-free safety feature stops heating the moment the basket disengages from internal sensors. Cooking resumes instantly when reinserted—no button presses needed.
Maximize this feature:
– Always pull the basket straight out (angled removal may jam sensors)
– Never touch the basket rim—it exceeds 300°F during cooking
– Check if your model requires partial basket removal (some need 2+ inches pulled out)
If cooking doesn’t pause automatically, your unit lacks this feature—rely on Start/Pause instead. Never force basket removal if stuck; press the release button first.
Wait for Timer Auto-Shutdown
Setting the timer to your desired cook time triggers the safest hands-off shutdown. When the countdown hits 00:00:
- Heating elements deactivate immediately
- The fan runs 60-90 seconds for cooling (listen for it stopping)
- Displays show “End” or revert to clock mode
- Units enter low-power standby (still drawing minimal electricity)
This method prevents user error for busy cooks. But remember: food stays scorching hot inside the insulated basket for 3+ minutes after shutdown. Always wait for the fan to stop before opening—rushing causes 68% of steam burns.
Allow 30-Second Cooling Window
Never open your air fryer immediately after shutdown. Trapped steam reaches 212°F and can cause third-degree facial burns when released suddenly. This cooling period applies whether you used the power button, timer, or dial.
Execute safe opening:
1. After full shutdown, count “one-Mississippi” to 30
2. Crack the basket open 1 inch to vent steam
3. Wait 5 more seconds before full removal
4. Use silicone-tipped tongs for food retrieval
Skipping this step risks severe burns—especially with high-moisture foods like frozen veggies or fish. If steam visibly billows when opening, close immediately and wait longer.
Check Food Temperature Mid-Cycle
Stopping to verify doneness requires strategic shutdown techniques. After pausing or powering off:
- Insert a probe thermometer into the thickest food section
- Compare readings to safety minimums:
– Poultry: 165°F
– Fish: 145°F
– Reheated leftovers: 165°F - If undercooked, resume cooking within 2 minutes to prevent bacterial growth
Never leave food sitting for >5 minutes during checks—rapid cooling requires 25% longer re-cooking time. Always re-pause before thermometer insertion to avoid accidental button presses.
Complete Storage Shutdown Process

Long-term storage demands this 6-step shutdown:
1. Let the final cooking cycle expire naturally (don’t manually stop early)
2. Unplug and wait 20 minutes until exterior is cool-to-touch
3. Wipe interior with damp cloth—no standing water near vents
4. Dry basket/tray completely before reassembly
5. Wrap cord loosely (sharp bends damage internal wires)
6. Store upright in dry area (humidity causes electrical shorts)
Never store while warm—trapped heat creates condensation that corrodes heating elements. Verify the unit is room temperature by resting your palm on the base for 5 seconds.
Handle Post-Shutdown Heat Safely

Your air fryer stays dangerously hot for 15+ minutes after shutdown. Critical heat retention timelines:
| Component | Safe Handling Time |
|---|---|
| Basket interior | 10+ minutes |
| Cooking chamber | 8+ minutes |
| Exterior base | 5+ minutes |
Always test the basket handle with the back of your hand before grabbing. If it feels warm, wait. For stubborn grease, never use cold water on hot components—thermal shock cracks baskets.
Maintain Electrical Safety After Shutdown
Unplugging after every use prevents 91% of electrical failures. Post-shutdown habits that protect your unit:
- Check cords for fraying before plugging in next time
- Wipe outlet prongs with dry cloth to remove grease buildup
- Avoid coiling cords tightly—store with 3-inch loops
- Never use extension cords (voltage drops damage motors)
If you smell ozone or see discoloration near the plug, stop using immediately—these indicate imminent electrical failure. Most manufacturers void warranties for surge damage, so invest in a $10 outlet protector.
Mastering these shutdown methods transforms air fryer safety. Always use the power button for speed, the timer dial for mechanical units, and the plug pull only for emergencies. That critical 30-second cooling window prevents burns more effectively than any gadget. Unplug after every session—standby mode still risks fire hazards. Your air fryer will deliver crispy perfection for years when you prioritize correct shutdown. For next-level safety, bookmark your model’s manual online (search “[Your Model] + shutdown protocol”)—it contains factory-specific quirks no generic guide covers.


