
Your new air fryer oven sits on the counter, promising golden fries and crackling chicken skin with just a spritz of oil—but those buttons and settings might leave you paralyzed. You’ve heard air-frying cuts calories by 70-80% compared to deep-frying, yet your first batch of soggy wings proves you’re missing critical techniques. Whether you upgraded from a basket model or this is your inaugural air-frying experience, mastering this appliance transforms rushed weeknight dinners into restaurant-worthy feasts.
Unlike traditional ovens, air fryer ovens blast food with superheated air at jet-engine speeds, creating Maillard reaction magic without drowning ingredients in oil. But cramming it like a conventional oven or skipping preheating sabotages results instantly. This guide cuts through the confusion with field-tested protocols straight from appliance engineers—no fluff, just actionable steps that guarantee crispy exteriors and juicy interiors every time. You’ll learn why your fries stick, how to revive last night’s pizza, and why aerosol sprays permanently wreck your non-stick coating.
Essential Tools That Prevent Disaster

Skip these accessories and you’ll battle smoke alarms and soggy food. Every air fryer oven requires specific hardware to harness its cyclonic airflow:
- Perforated crisper tray – The only tray that allows 360° air circulation; solid pans create steam pockets
- Drip tray – Catches grease blowback (critical for wings or bacon to prevent smoking)
- Pump-action oil sprayer – Delivers micro-fine oil mist (aerosols like Pam corrode coatings with propellants)
- Silicone-tipped tongs – Flips food without scratching trays when surfaces hit 400°F+
- Instant-read thermometer – Non-negotiable for chicken (165°F) or steak (135°F for medium-rare)
Pro tip: Never line the oven cavity floor with parchment—only use it on the drip tray. Direct contact with heating elements causes fires.
Burn-Off Process That Eliminates Toxic Fumes
Manufacturing residues turn your kitchen into a chemical lab during first use. This 20-minute ritual prevents hazardous smoke:
Remove Packaging Thoroughly
Check hidden spots: inside racks, behind control panels, and under the drip tray slot. Melted plastic emits carcinogens at 400°F.
Execute Mandatory Burn-Off
- Place empty oven at 400°F (205°C)
- Run for 15 minutes with door sealed shut
- Ventilate room—expect acrid odor as factory oils vaporize
- Wipe interior with damp microfiber cloth after cooling
Warning: Skipping this creates persistent smoke during cooking that stains food and triggers detectors.
Preheat Like a Pro (Avoid 7-Minute Delays)
Basket air fryers preheat in 3 minutes, but ovens need extra time due to larger cavities. Use this foolproof method:
| Your Oven Type | Preheat Protocol |
|---|---|
| With auto-preheat | Select Air Fry → Set temp → Wait for beep (usually 5-8 min) |
| Manual controls | Run empty at target temp for 5 minutes while prepping food |
Visual cue: Heat waves shimmering above the crisper tray mean airflow is optimal. Loading too early steams food instead of crisping it.
Food Prep Secrets for Unbeatable Crispness

Moisture is the enemy of crunch. Apply these rules before loading the oven:
Dry & Oil Strategically
- Pat chicken skin with paper towels until no residue transfers (wet surfaces steam instead of sear)
- Spray 1 teaspoon max of oil per pound—pouring causes pooling and smoke
- Skip oil entirely for fatty foods like duck breast or salmon skin
Cut for Even Cooking
Dice potatoes into ¾-inch cubes (smaller pieces burn; larger stay soggy). For wings, separate drumettes from flats—uniform shapes cook simultaneously.
Critical mistake: Wet batter (like tempura) blows onto heating elements. Use dry coatings: panko, almond flour, or cornflake crumbs.
Temperature & Timing Cheat Sheet
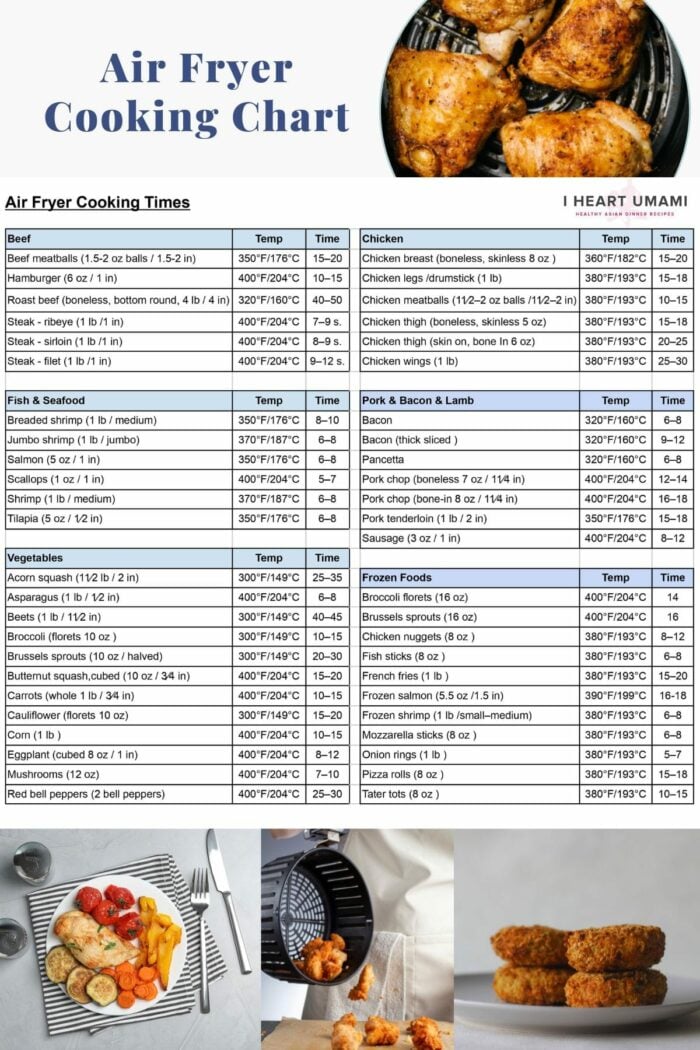
Stop guessing—use this reference for perfect results:
| Food | Temp | Time | Technique |
|---|---|---|---|
| Chicken Wings | 425°F | 18 min | Flip halfway; pat dry pre-cook |
| Frozen Fries | 425°F | 22 min | Shake twice; skip preheating |
| Salmon Fillets | 400°F | 9 min | Skin-side down; no flip |
| Brussels Sprouts | 425°F | 10 min | Toss with 1 tsp oil; shake once |
| Reheating Pizza | 350°F | 4 min | Place directly on rack; no tray |
Pro conversion: Drop deep-fry temps by 25°F but keep time identical. For oven recipes, reduce temp 25°F and time by 20%.
6-Step Operation for Foolproof Results
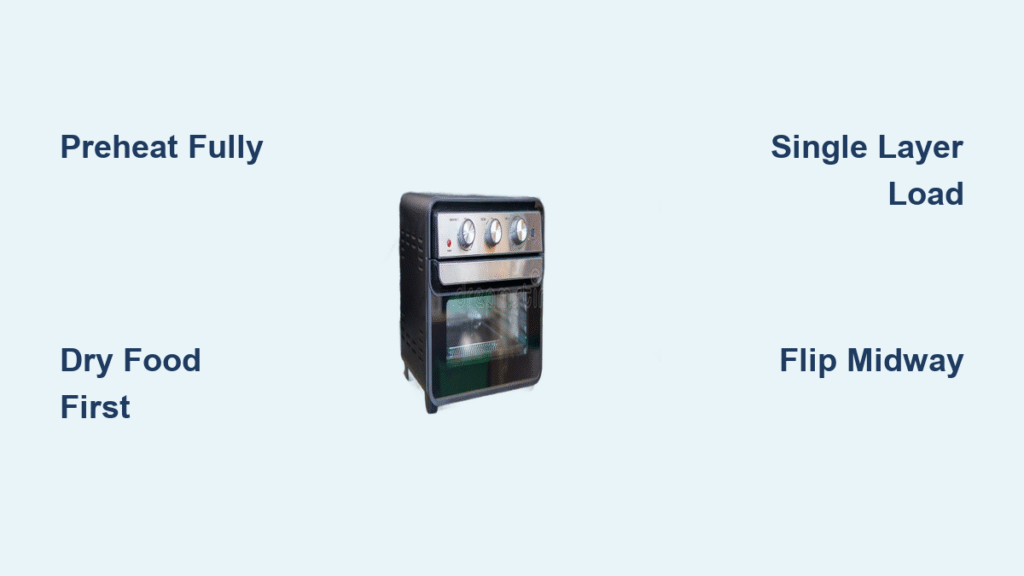
1. Preheat Fully
Run empty until heat waves are visible (5+ minutes). Cold starts add 7 minutes to cook time.
2. Load Correctly
- Arrange food in single layer with space between pieces
- Slide crisper tray into middle rack position (top rack burns; bottom steams)
- Never exceed ⅔ tray capacity—overcrowding traps steam
3. Set & Start
Input time/temp from cheat sheet. Close door firmly to maintain airflow pressure.
4. Flip/Shake Precisely
At 50% mark:
– Rotate tray 180° for even browning
– Flip proteins with silicone tongs
– Shake veggies in tray vigorously
5. Verify Doneness
Insert thermometer into thickest part:
– 165°F for poultry
– 145°F for fish
– 130°F for medium-rare steak (carryover cooking adds 5°F)
6. Remove Immediately
Left in hot trays, food overcooks in 90 seconds. Use oven mitts—trays exceed 300°F.
Cleaning Routine That Stops Smoking
Grease buildup causes 90% of smoke alarms. This 5-minute ritual prevents disasters:
After Every Use
- Unplug and cool 15 minutes (trays warp if rinsed hot)
- Remove crisper/drip trays while warm—food slides off effortlessly
- Soak trays in hot water for 5 minutes; scrub with non-scratch sponge
- Wipe cavity with vinegar-water mix (1:1 ratio); never use oven cleaner
Monthly Deep Clean
- Soak racks in degreaser for 20 minutes
- Vacuum fan vents with soft brush attachment
- Test door seal with dollar bill—if it slips out, replace gasket
Troubleshooting Emergency Fixes
| Symptom | Instant Solution |
|---|---|
| Food pale & soggy | Preheat 5+ min; reduce oil by 50%; increase temp 25°F |
| Excessive smoke | Empty drip tray; cut oil in half; never use aerosols |
| Uneven browning | Rotate tray 180° at halfway; avoid top rack position |
| Burnt bottoms | Place food on higher rack; reduce temp 20°F |
Critical: If smoking occurs, unplug immediately—never leave unattended.
Advanced Settings for Non-Air-Fry Tasks
Your oven isn’t just for fries. Activate these modes:
- Reheat (350°F): Restores crispness to pizza or fries in 4 minutes
- Dehydrate (140°F): Makes beef jerky in 4 hours (pat meat dry first)
- Proof (90°F): Rises dough in 45 minutes (place bowl over water tray)
- Broil (500°F): Melts cheese on casseroles in 90 seconds
Never use convection bake mode—air fry mode has higher fan speeds for true crispness.
Fire Prevention Safety Rules
A single mistake risks kitchen fires. Adhere to these:
- Never use aerosol sprays—propellants ignite on contact with elements
- Keep 3-inch clearance from walls (traps heat, melts cabinets)
- Unplug when idle—prevents electrical faults during power surges
- Never insert utensils while running—fan blades shatter on contact
Urgent: If food ignites, unplug and close door—oxygen starvation extinguishes flames.
Your 7-Point Pre-Cook Checklist
Tape this inside your cabinet door:
- [ ] Crisper tray dry and inserted (no water spots)
- [ ] Preheated 5+ minutes (heat waves visible)
- [ ] Food pat-dried and sprayed with 1 tsp oil max
- [ ] Single layer with space between pieces
- [ ] Temp/time set per cheat sheet (not guesswork)
- [ ] Flip/shake at halfway mark
- [ ] Thermometer verified before serving
Master these steps and your air fryer oven becomes indispensable—delivering crispy, oil-free meals 20% faster than conventional ovens while using 80% less energy. No more soggy leftovers or smoke-filled kitchens: just golden perfection at the push of a button. Start tonight with frozen fries (425°F for 22 minutes, shaken twice) and taste the difference precise technique makes.


