
You’ve just unboxed your new Gourmia air fryer, but those blinking lights and multiple buttons make you hesitant to even plug it in. You’re not alone—most air fryers become expensive countertop decorations because users can’t figure out how to properly operate them. This frustration ends today. Within minutes, you’ll know exactly how to use Gourmia air fryer models to create perfectly crispy food with minimal oil, avoiding common mistakes that lead to uneven cooking or smoke alarms.
Your Gourmia air fryer’s digital interface might seem complicated at first glance, but it’s actually designed for simplicity once you understand the patterns. Whether you own the compact GAF500 or the larger GAF700 series, these techniques work across all Gourmia digital models. This guide cuts through the confusion, showing you exactly which buttons to press for perfect results every time—no more guessing whether to use presets or manual mode.
Stop wasting money on takeout when your air fryer can make better fries, chicken, and even baked goods. By the end of this guide, you’ll confidently navigate your Gourmia’s features, troubleshoot issues before they ruin dinner, and unlock professional-level results that will make you wonder how you ever cooked without it.
Remove Packaging and Complete Initial Burn-Off
Before you cook a single fry, you must properly prepare your Gourmia air fryer. Manufacturers apply protective coatings during shipping that can create unpleasant odors or even smoke if not removed. Start by completely emptying the box—check inside the basket for hidden silica gel packets or plastic inserts that could melt during first use. These small details matter because leaving them in could damage your appliance before you even begin cooking.
Wash both the basket and crisper plate in warm, soapy water with a non-abrasive sponge. Rinse thoroughly and dry completely—water spots can cause steam during preheating. Now for the critical initial burn-off: plug in your air fryer on a heat-resistant surface with at least 5 inches of clearance behind it (where the vent is located), then run it empty at 400°F for 15 minutes. Expect some smoke during this process—it’s normal as factory residues burn off—but never leave it unattended.
This step isn’t optional. Skipping the burn-off leaves chemical residues that can transfer to your food, creating off-flavors and potentially harmful compounds. The smoke might trigger your alarm, so open a window and keep a close eye on the unit. Once complete, your Gourmia will operate cleanly for all future cooking sessions.
Decode Your Gourmia Control Panel in 60 Seconds
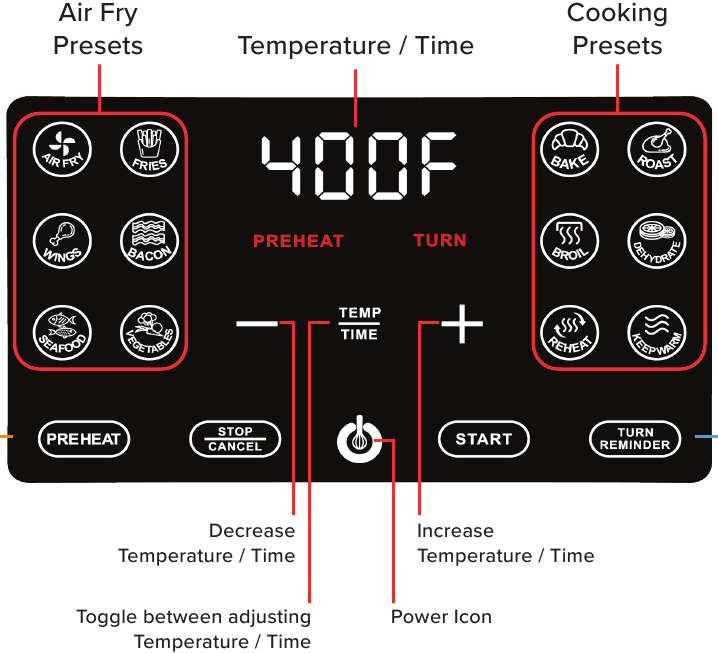
Your Gourmia’s digital display holds the key to perfect cooking, but only if you understand what each element means. The power button requires a 3-second press to activate—this safety feature prevents accidental starts. Once on, you’ll see temperature, time, and preset options. Temperature adjustments happen in 5-degree increments from 180°F to 400°F, while time settings range from 1 to 60 minutes depending on your model.
Presets simplify cooking common foods with one-touch convenience:
– Fries: Automatically sets 380°F for 18 minutes
– Chicken: 360°F for 25 minutes (ideal for wings or tenders)
– Fish: 350°F for 12 minutes to prevent drying
– Bake: 320°F for 30 minutes (great for small cakes)
– Reheat: 300°F for 8 minutes for leftovers
Press any preset once to select it, then immediately adjust time or temperature if needed—your changes apply only to that cooking session. For complete control, skip presets entirely by pressing temperature and time buttons directly. Manual mode is essential for recipes requiring specific settings like 375°F for 22 minutes. Remember that Gourmia air fryers cook faster than conventional ovens, so always check food 2-3 minutes before the timer ends.
Perfect Preheating for Crispy Results Every Time

Preheating adds 3-5 minutes to your cooking time but dramatically improves texture for most foods. Frozen fries, fresh vegetables, and thin protein cuts require immediate high heat to achieve that golden crispness without overcooking. Skip preheating only when reheating leftovers or cooking delicate items like fish that benefit from gradual heating.
Set your desired cooking temperature with an empty basket and wait 3-5 minutes before adding food. Higher temperatures (400°F) need the full 5 minutes, while lower settings (320°F) require just 3. Some Gourmia models display “PH” during preheating—wait for this indicator to disappear before loading food. If your display shows temperature climbing rapidly when you set a program, your model preheats automatically; otherwise, manually preheat before adding ingredients.
Never skip preheating for foods requiring crisp exteriors. Without it, moisture lingers too long, steaming instead of crisping your food. This single step transforms soggy fries into restaurant-quality perfection—worth the extra few minutes every time.
Load Your Basket for Maximum Airflow and Crispiness

Overcrowding is the #1 mistake new Gourmia users make, leading to disappointing, steamed results instead of crispy perfection. Fill baskets no more than halfway for fries or vegetables, one-third full for proteins like chicken breasts. Check your basket’s interior for maximum fill lines—exceeding them traps steam and blocks the rapid air circulation that makes air frying work.
Spread foods in single layers whenever possible, especially for items like chicken wings or fish sticks. Shake the basket every 5-7 minutes using the handle for even browning—Gourmia’s rapid air technology cooks from the top down, so rotation is essential. For larger items that can’t be shaken, use silicone-tipped tongs to rearrange pieces halfway through cooking.
Use oil sparingly: Gourmia air fryers excel with minimal fat. Lightly spray or toss foods with just 1-2 teaspoons of oil maximum. Too much oil drips into the heating element, creating smoke and potential fire hazards. For frozen foods, skip oil entirely—they’re already pre-treated with just enough fat for crisping.
Troubleshoot Common Gourmia Air Fryer Issues Immediately
Smoke during cooking signals excess oil dripping onto the heating element. Immediately stop cooking, remove the basket, and clean both the basket and heating area thoroughly. Avoid high-fat foods like bacon without placing a drip pan underneath to catch rendered fat. If smoke persists after cleaning, check for food particles lodged in the heating coils that could be burning.
Uneven browning means poor air circulation—rotate the basket 180 degrees halfway through cooking. Ensure nothing blocks the vents around your countertop, as restricted airflow creates hot spots. Reduce batch sizes if some pieces burn while others stay pale. Never let foods touch the heating elements directly, as this creates scorch marks without proper cooking.
Error codes require specific responses: “E1” indicates overheating—unplug for 30 minutes and ensure proper ventilation. “E2” suggests temperature sensor issues—contact Gourmia support directly. “E3” means the basket isn’t inserted correctly—remove and firmly reseat until you hear a click. Never ignore error codes, as continuing to operate with these issues can damage your appliance.
Clean Your Gourmia Air Fryer Properly After Each Use
Let your air fryer cool for 10 minutes post-cooking before cleaning—sudden temperature changes can damage components. Remove the crisper plate and wash both pieces with warm, soapy water using a non-abrasive sponge to protect the non-stick coating. Pay special attention to the basket mesh holes where food particles lodge. Dry thoroughly before next use; water droplets create steam during preheating that affects cooking results.
Weekly deep cleaning prevents performance issues. Soak removable parts in hot, soapy water for 15 minutes to loosen stuck-on residue, then use a soft brush for stubborn bits in the basket mesh. Wipe the heating element area with a damp cloth only when completely cool—never submerge the main unit. Clean the exterior with a mild cleaner and soft cloth to maintain appearance.
Prevent future cleaning headaches by lining the basket bottom with parchment paper or silicone mats for messy foods like breaded chicken. Spray oil onto food before placing in the basket, not directly into the fryer—this reduces splatter on heating elements. Empty crumb trays daily if your model includes one; accumulated debris burns during cooking and affects food flavor.
Maximize Cooking Results with Pro Techniques
Layer foods strategically when using multi-level accessories—place quick-cooking items on top racks and denser foods below. Start proteins first, adding vegetables for the final 5-7 minutes to prevent overcooking. For mixed meals, cook proteins completely, then add delicate items like asparagus for the last few minutes.
Use accessories effectively to expand capabilities: metal racks double cooking capacity (rotate positions halfway through), silicone cups work perfectly for muffins and eggs, and perforated parchment simplifies cleanup. Avoid glass dishes unless labeled air fryer-safe—thermal shock can cause dangerous breakage in the rapid temperature environment.
Convert traditional recipes with simple adjustments: reduce conventional oven temperatures by 25°F and cut cooking time by 20%. Check doneness early—air fryers cook from the outside in rapidly. For recipes requiring over 400°F, reduce to 380°F and extend time slightly to prevent burning while achieving proper doneness.
Your Gourmia air fryer becomes indispensable when you master these techniques. Start with simple frozen fries to build confidence, then experiment with vegetables and proteins using the temperature guidelines provided. Remember—slightly undercooked food continues cooking from residual heat, so err on the shorter side initially. Within days, you’ll instinctively know the perfect settings for your favorite foods, making your Gourmia the most reliable tool in your kitchen arsenal.


